
Create a Server from a Modpack Manually
This guide is for advanced, custom installations only.
This guide is for intermediate to advanced users. Before using this guide, we suggest looking through our current list of installable modpacks. If you don't find the modpack you want to play in the list, you should also look on CurseForge on the modpack's files page to see if there is a server download available. In that case, you will want to follow our guide for installing a custom modpack.
This guide will help you take nearly any Minecraft modpack and turn it into a server. This applies to most modpacks made for Minecraft version 1.7.10 and above.
Modloaders
There are several modloaders for Minecraft. These are pieces of software that integrate with the game and facilitate the loading and running of individual mods. The 3 most popular are Forge, Neoforge, and Fabric. This guide should apply to all 3 of those.
Prerequisites
You will need a few things to begin:
- A modpack launcher
- A modpack installed in that launcher
- A blank modloader server
First, install a Minecraft modpack on your computer. This can be done through any of the popular launchers such as Curseforge, Technic, Modrinth, or Prism, although there are many more. The most popular is Curseforge, so I will be using that in examples, but they are interchangeable for this process.
Preparing a Blank Server
Then, you need to find out what modloader, modloader version, and Minecraft version your modpack uses so you can install a blank modloader server with Akliz. This is the server you will upload your modpack files to later. I will be using the Curseforge launcher and the All the Mods 10 modpack as an example.
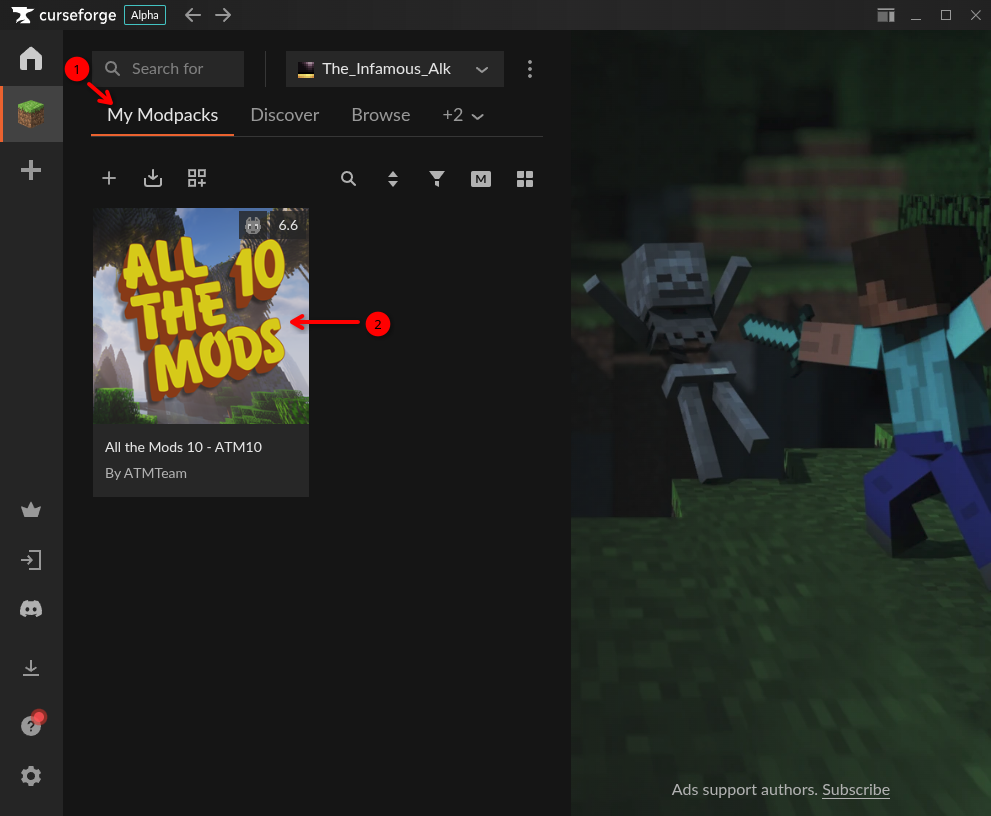
- In the "My Modpacks" section of the launcher, click your modpack to open the details screen.
- On this screen, you can see both the game version and the modloader version. For example, ATM10 version 6.6 uses Minecraft 1.21.1 and Neoforge version 21.1.224, as shown in the screenshot below.
- Remember or note down the Minecraft and Modloader version.
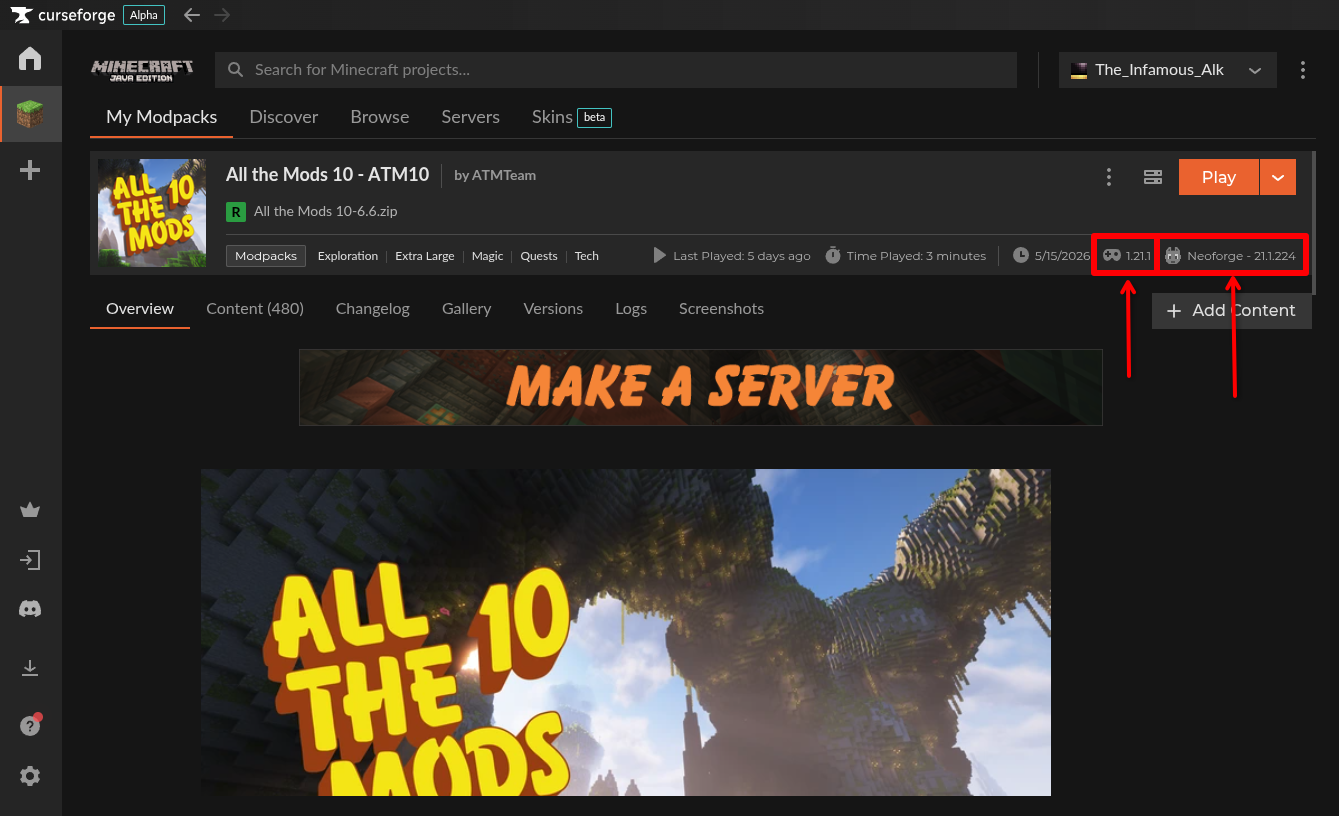
In this example: Minecraft version (1.21.1) and Modloader (Neoforge) version (21.1.224)
Now, we will install a blank modloader server. Based on the previous example, we will be installing a Neoforge server, but the instructions are similar for all modloaders.
- From your Akliz servers list, click "New Server".
- Search for your modloader. For example "Neoforge".
- Click the result for your modloader. Make sure to not install one of the other pre-built modpacks.
- Fill out the information on this screen and click "Create Server".
- Now click "Manage" next to your new server on your Servers page.
- Your blank modloader server is now installed. Stay on this page for later. We'll come back to it once you have prepared the modpack files on your computer.
Finding the Modpack Files
Once you have a modpack installed and a blank server created, you can start preparing the files. In the Curseforge launcher, just right-click the modpack in the "My Modpacks" tab, and click "Open Folder". This might be slightly different for other launchers, but all launchers allow you to open a folder which contains your modpack files. You will see a window open with several folders and files. These are your modpack files. You don't want to edit these directly, because you still need them to run the game on your computer, so we are going to make a copy that you can edit.
Preparing the Server Files
Make a new folder somewhere convenient, and name it something like "server pack". Copy (don't move or cut!) the files from your modpack files to the "server pack" folder. Files should be identical in both folders at this point. You won't need to access the original modpack files after this, so you can close that window.
Now, we can start removing files and folders that the server doesn't need. Most client installations (your modpack that you run on your computer) have many more files and folders than a server needs to run. At its core, technically modpacks may only need the mods folder uploaded to a server and nothing else. However, many modpacks have extra content that is required. I will list some of the most common folders that your server may need:
- config
- kubejs
- local
- mods
- resources
- scripts
- datapacks
These are the most common folders needed when creating server files. Some of these may be missing depending on your modpack, and that is okay, as long as the mods folder is present.
Once you have identified these folders, delete the rest of the folders and files from your "server pack" folder.
Note: The
savesfolder contains your single-player world saves. If you don't want to use those on the server, you can delete thesavesfolder. If you do want to upload a single-player save, each world folder is contained within the saves folder. You will want to move your desired world folder into the main "server pack" folder. Here's more info on how to upload a single-player world to a server.
Uploading the Files to the Server
Now, it's time to actually put these files into your server. You will need to read our guide on connecting to the server with SFTP, which is what you will use to upload files.
Once connected with SFTP, drag the contents of your "server pack" folder on the left of the SFTP program into the main folder of your server on the right. You may have to open the main folder first, which will be named something like minecraft-neoforge, and then drag the files in.
Once all files are uploaded, verify they are there by going to your server's console page that you had open from earlier, and clicking the "Files" tab. If you were already on that page, refresh the page first. Click the mods folder, and make sure you see files in that folder. There will be several in there, and they should all end in .jar . If there are no files in the mods folder, you may have dragged the wrong folder, or dragged it inside the wrong destination folder on the server.
Now, click "Start" on your server's page. If your server starts without issue, you are good to go and you can skip the next section. If your server crashes, it may be due to client-only mods, so read on to the next section.
Client-side Mods
The final step is removing any client-only mods from the server. These are mods that can only run on the client (your local modpack), and running them on a server will crash the server. Typically, client-only mods don't add any items, mobs or game mechanics. I will list some notable examples below:
- Sodium
- Fancy Menu
- Iris
- Entity Texture Features and Entity Model Features
- Legendary Tooltips
- Lithium
- Mod Menu
- Sound Mufflers This is a small list of examples, but there are many more. If you have any mods in your
modsfolder that are in that list, remove them from the server in SFTP.
Now that you've removed those, it's time to test the server. It is very likely that you will have more client-only mods in your server. If you start the server and it crashes after a few seconds or minutes, you can check the logs to see what happened. Click the "Console" tab, and watch the console text. If it crashes, scroll up a few lines and look for any errors. Or you can click the logs folder and open the latest.log file, then scroll down to the bottom. Often, client-only mods will be listed in the console text if they caused a crash, but not always. It may look something like this:
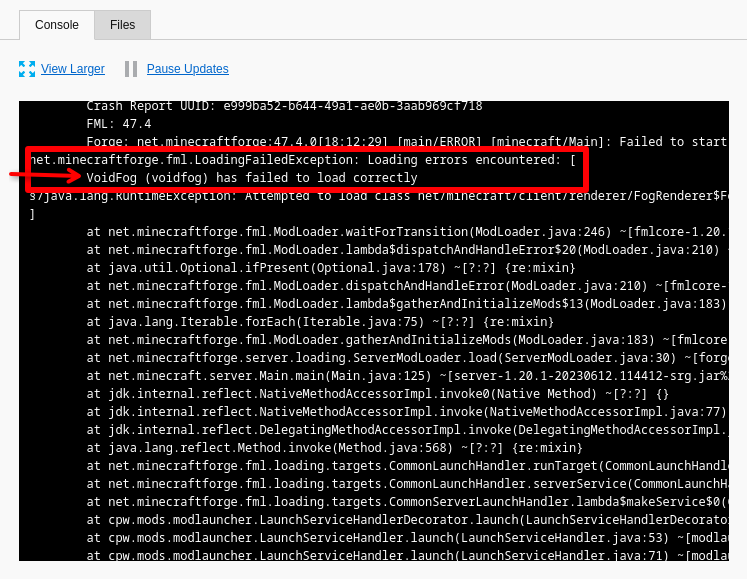
In this example, VoidFog has failed to load due to being a client-only mod. Remove it, and the server works. You may need to scroll up slightly to view this section of the error in the server console.
If you see something like this, delete the mods it lists here using SFTP. Then start your server again and see if any other crashes or errors come up.
In many cases, finding all of the client-only mods can be very difficult if it's your first time making server files for a modpack. But don't worry - we can help. As always, if you would like help with this process after giving it a go yourself, reach out to us in our instant 1-on-1 support chat in the bottom right corner of the page and we can help get your server running and answer any other questions you may have.
Join your Server
Finally, it's time to join your server. Load up your modpack from your launcher, and use your server's friendly address or direct IP to connect to your server.
If you get any errors when joining your server, reach out to support using the chat button on the bottom right corner of the page and we can help. And have fun!
Updated 7 days ago