Upload a World to Your 7 Days to Die Server
To upload a world to your 7 Days to Die server: Locate your world files, upload them to your server using SFTP, and configure your server in Command Center to load your world.
Generate a World on Your Computer
We recommend generating worlds on your own computer rather than on the server. The world generation process requires a lot more memory than you may have allocated to your server.
- Load up 7 Days to Die and click on New Game.
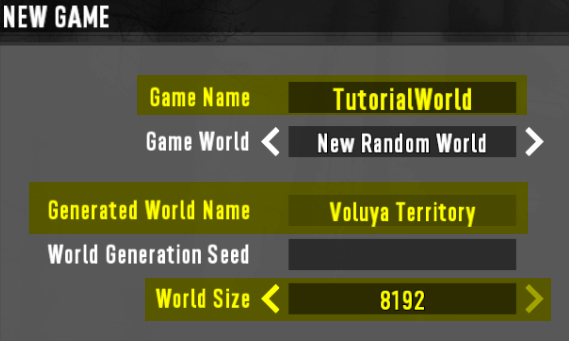
- Change Game World to New Random World
- Make a note of the Game Name, Generated World Name and World Size that you use. For this example, we're using TutorialWorld as the Game Name, Voluya Territory as the Generated World Name (This name is automatically generated) and 8192 as the World Size.

- Click Start and wait for the generation to finish.
Locate Your Files on Your Computer
- Hit Windows Key+R on your keyboard.
- In the field that pops up, type
%appdata% - Double-click on
Roamingand then on7DaysToDie. Doing so should put you in a folder that looks similar to this:

Under the GeneratedWorlds and Saves folders will be folders named the same as the Generated World Name from above (such as Voluya Territory) . Those will be the folders you will upload to your server, so make note of them.
Upload Your Files to Your Server
Before uploading anything and changing the settings, shut down your server first.
- Connect to your server using SFTP.
- Drag the folder from the GeneratedWorlds folder on your PC to the following folder on your server:
/7-days-to-die/Data/Worlds - Drag the folder from the Saves folder on your PC to the following folder on your server:
/7-days-to-die/Saves/Saves. You may have to create this folder, if it does not exist.
Configure Your Server to Use Your Files
- Open Command Center
- Click on Manage next to the server you've been uploading files to.
- Click on the Files tab and then click on
serverconfig.xml - Look for the following section:
<!-- World -->
<property name="GameWorld" value="Navezgane"/>
<property name="WorldGenSeed" value="asdf"/>
<property name="WorldGenSize" value="4096"/>
<property name="GameName" value="My Game"/>- Change Navezgane to the Generated World Name you made note of before.
- Change WorldGenSize to the World Size you used to generate the world.
- Change GameName to the Game Name you used earlier. (This name is also the name of the folder under
/7-days-to-die/Saves/[GameWorld]/on your server, in case you can't remember it.)
ExampleIf we were using the same information from the example screenshots, then we'd change this section to look like this:
<!-- World -->
<property name="GameWorld" value="Voluya Territory"/>
<property name="WorldGenSeed" value="asdf"/>
<property name="WorldGenSize" value="8192"/>
<property name="GameName" value="TutorialWorld"/>
- Start your server.
- Enjoy!
Updated 3 months ago

