How to Install 7 Days to Die Mods Client-Side (Steam) | Akliz
Learn how to install client-side mods for 7 Days to Die on Steam. Follow our step-by-step guide to customize your gameplay experience!
How to Install Client-Side Mods for 7 Days to Die
This guide will walk you through the process of installing client-side mods for 7 Days to Die on Steam. Whether you're adding small modlets or full overhaul mods, our step-by-step instructions ensure your gaming experience is fully customized.
How to Install Mods on Your Client for Steam
Installing mods for 7 Days to Die is a simple yet powerful way to enhance your gameplay. If you're also running a server and need guidance on setting up mods there, check out our guide to installing mods on a 7 Days to Die server. For now, let’s focus on setting up client-side mods!
- Download the latest version of the mod client files from your desired source.
- Navigate to your 7 Days to Die folder on your PC
- Default location:
C:\Program Files (x86)\Steam\steamapps\common\7 Days To Die
- Default location:
- Check if a "Mods" folder exists in this directory. If not, create one.
- Note: This is case-sensitive, so name it exactly "Mods."
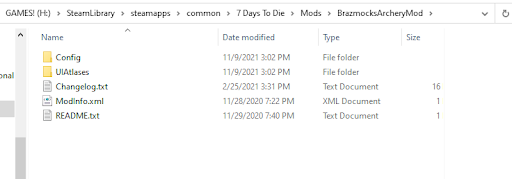
- Copy the mod folder(s) to your new “Mods” folder. Leave the names for the folders as-is and make sure they contain the
ModInfo.xmlfile as shown in the examples below.

"Mods" Folder

Inside of a "Mods" Folder
- Start your game and check if the mods have loaded:
- Open the console with the
F1key and look for mod-loading messages (e.g., "Loading Mod: [Mod Name]").
- Open the console with the

Sample Console
- Connect to your modded server. Ensure the mods match on both the server and client for a seamless connection.
Installing Specific Mods or Modlets
Modlets are smaller modifications that tweak specific parts of the game. Here’s how to install them:
- Follow the same steps as the Steam installation guide above.
- Confirm that each modlet folder remains intact and contains the required
ModInfo.xmlfile.
Installing Overhaul Mods
The Easy Way: Using the Mod Launcher
The simplest method to install overhaul mods is by using the 7 Days to Die Mod Launcher. This tool automates the download and installation process, ensuring everything is configured correctly. We recommend this method for a hassle-free experience.
The Hard Way: Manual Installation
For those who prefer a manual approach—or if the desired overhaul isn’t available on the launcher—follow these steps:
- Download the latest version of the overhaul mod files.
- Navigate to your 7 Days to Die folder on your PC:
- Default location:
C:\Program Files (x86)\Steam\steamapps\common\7 Days To Die
- Default location:
- Copy the overhaul files to that folder, ensuring to overwrite any existing files it asks to overwrite.
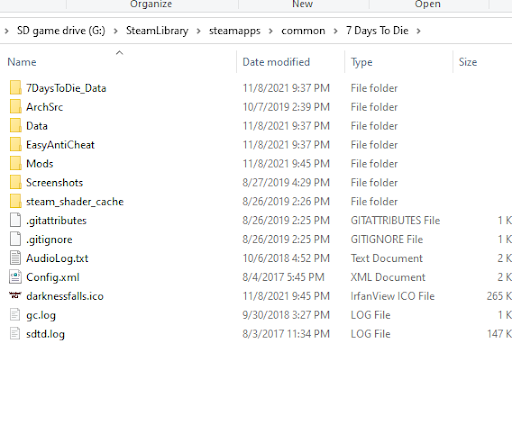
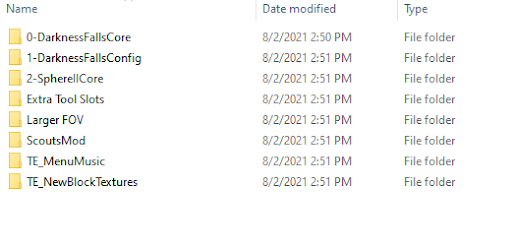
- Example: For the Darkness Falls overhaul, your folders should look similar to the following:

7 Days to Die Folder

"Mods" Folder
- Launch the game and connect to your modded server. As long as the mods match on both the server and client, you should be able to connect fine.
Troubleshooting and Tips
If you encounter issues, here are some tips:
- Mods Not Loading: Double-check folder names and ensure the
ModInfo.xmlfile exists in each mod folder. - Connection Errors: Verify that the server and client mods match exactly.
- Backup Your Files: Before overwriting files during an overhaul installation, create a backup of your original 7 Days to Die directory.
Enhance Your Experience with Akliz Hosting
Want an even smoother modding experience? Consider hosting your server with Akliz! Our powerful servers ensure your mods run flawlessly, giving you and your friends the ultimate 7 Days to Die experience. Explore Akliz Hosting Plans.
Updated 3 months ago
