Install a Fabric Server
The Easy WayThis guide is intended for advanced users only. Command Center provides an installer for recommended versions of Minecraft Fabric. If all you need is a base Minecraft Fabric install, you can set that up here.
Follow this tutorial to install a plain Fabric server. A Fabric server allows you to run Fabric mods on a Minecraft server. You'll need a server to install the files to, so if you don't have one, create a Custom Minecraft server.
Minecraft 1.17+For Minecraft 1.17 and higher, make sure you choose Java 16 for your Custom Minecraft server.
Download the Fabric Files
- Download the Fabric installer from the download page.
- Open the installer. Select the Server tab at the top of the window.
- Choose the version of Minecraft and the version of Fabric you'd like and pick a location you'll remember such as a folder on the desktop to install to.
- Click Install
- A new window will pop up with the option to download the Minecraft server jar. Click on Download.
Upload the Fabric Files to Your Server
- Connect to your server SFTP.
- On the Local site (left pane), navigate to the folder that you installed the Fabric server to. For example, it may be the folder that you created on your desktop.
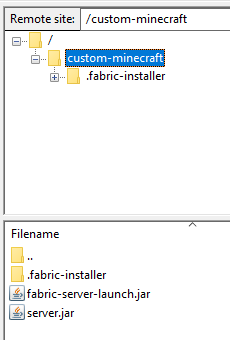
- Drag the files that were installed in that folder to the main folder on your server, such as
custom-minecraft. It should look something like this when you're done:

Select the Server JAR
- Login to Command Center.
- Go to the Server List page. Click the Manage button for the server you would like to add this Fabric server installation to.
- Click Game Settings from the Gear Icon menu.
- In the Custom JAR section, choose and install,
fabric-server-launch.jar.

- Restart your server.
Updated 3 months ago

