
How to Set Up an ARK: Survival Evolved Dedicated Server | Akliz
Learn how to set up an ARK: Survival Evolved server with Akliz. Follow our step-by-step guide for seamless multiplayer gameplay and customization.
How to set up an ARK: Survival Evolved Dedicated Server
Your Comprehensive Guide to Hosting with Akliz

Why Host a ARK Server?
Hosting a server with Akliz has several benefits over playing without a server, self-hosting, or hosting with another host.
- Performance: Using a dedicated server can drastically improve performance on your computer, since many of the game processes are offloaded from your computer to the server.
- Easy Control over gameplay settings: With an Akliz server, you have full control over your game. You have direct access to the files for customization.
- Opportunities to play with friends and build community: Having a server is great for playing with friends. The server can be online 24/7, so even when your computer is off, your friends can play. Growing an active community is easy when everyone has a server to hang out in!
- Simplify Your Server: Our in-house server management site, the Command Center, makes managing your server easy without restricting what you can do. Whether you're brand new to server hosting or a seasoned veteran, you will find our site easy to use and powerful at the same time.
- Reliable Backups: Included with all of our plans is our Vault system, which automatically makes backups of your server so you don't have to worry about losing your world if disaster strikes.
- No Hidden Fees: We charge you one price for your plan. There are no features locked behind a paywall, like mod support, storage space, automatic and manual backups, premium support chat, or anything else.
- Powerful Hardware: No matter what plan you choose, you get the same powerful server hardware. You don't have to pay extra to get the best we have to offer.

What You Need to Start Hosting Your ARK: Survival Evolved Server
Before you get started, there's a few things you'll need to get started on your ARK server:
- ARK: Survival Evolved on Steam or Xbox Windows Store: ARK Steam servers require the Steam or Xbox Windows version of the game to be able to join.
- Akliz Hosting Plan: ARK: Survival Evolved requires a minimum of 6GB of RAM to run. Depending on the number of players, you may need a larger plan. Choose a suitable hosting plan based on your needs. Check out the pricing page here to purchase one, or contact support via the chat bubble on the bottom right of the site if you don't know which plan is right for you.
- Internet Requirements: Make sure you have a stable internet connection. Almost all broadband connections should be able to play easily. You can test your ping to our servers using our free sample servers here!
How to Set Up Your ARK: Survival Evolved Server with Akliz
Step 1: Sign Up for Akliz Hosting
- Create an account here.
- Navigate to the Pricing Page and choose the plan that's right for you. You'll need a minimum of 6GB to run a ARK server.
- Click "Buy Now" next to the plan you want.
- Take a look at everything in the Plan Overview section and make sure all of your choices look good. (Hint: you can get a discount by choosing a term for your plan longer than 1 month!)
- Click Next.
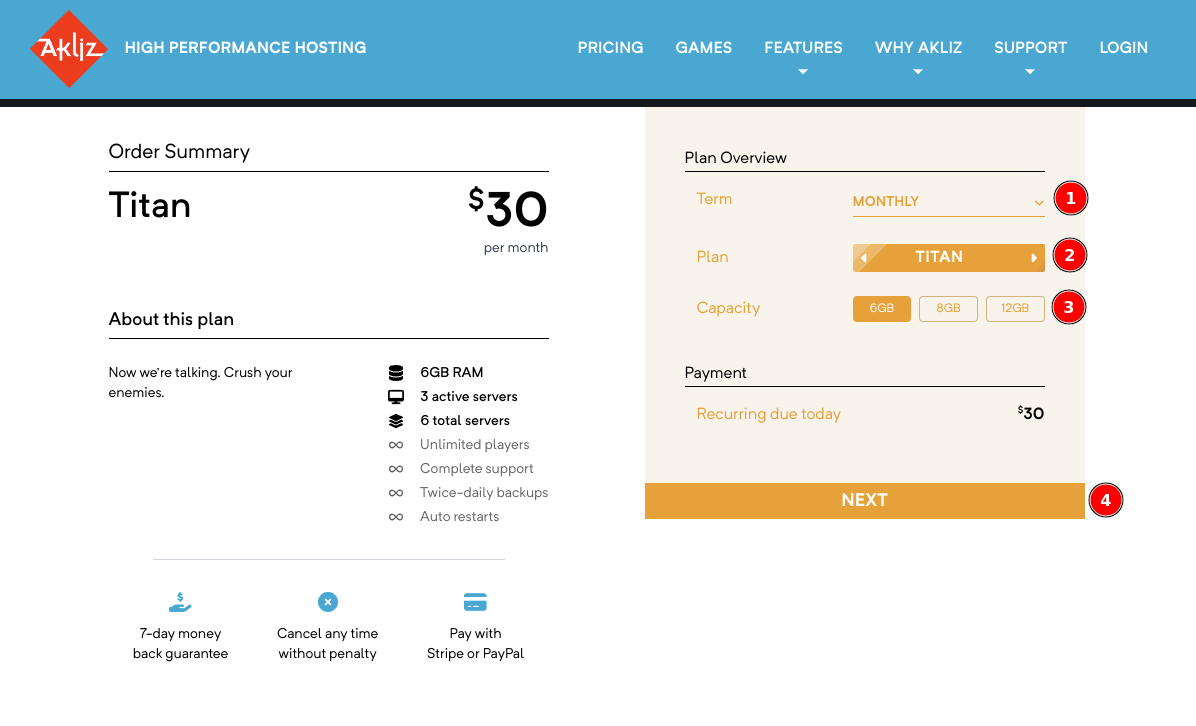
- Add a payment method. This can be a credit/debit card or PayPal.
- Click "Pay Now" to finalize your payment and start your plan!
Step 2: Access the Command Center
- Navigate to the Command Center and make sure you are still logged in.
- This will bring you to your Servers page. Here you will be able to see a list of any servers you have created.
Step 3: Create a New ARK Server
With any Akliz plan, once you have a plan you can start creating servers. These servers, when started, use your purchased RAM. You can see how much RAM you have used and available, as well as how many servers you can create and run on the left side of the Servers page.
- Now that you're in the Servers page, you should see a button at the top left labeled "Create a Server". Clicking that button will bring you to a list of games available for installation.
- Select "ARK: Survival Evolved" from the list of available games.
- On the next page, you will be able to create a friendly address that will be used to connect to your server. You can put anything you'd like here, as long as it's not already taken.
- In the same page, you can choose your RAM. The default is the minimum amount required for the game, but if you bought a plan with extra RAM, you can increase this up to the amount you purchased.
- Confirm the configuration and click "Create" to initialize the server.
- Once it is created, you can start your server by clicking the blue "Play" icon, or click on "Manage" next to your server to see the console and other info, and you can click "Start" at the top right of the page. Your server needs to be started before you can join.

How to Join Your ARK Server
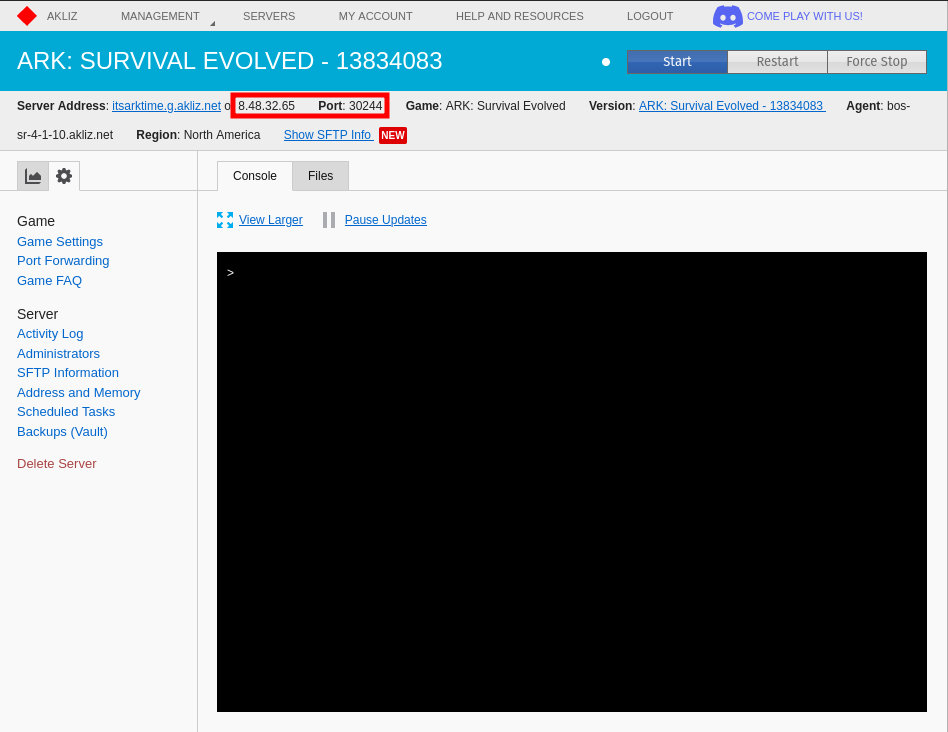
Step 1: Locate the server IP address in the Akliz Command Center
- Click "Manage" next to the name of your server in Command Center
- The IP address and Port will be listed on the top of the page, next to your Friendly Address.
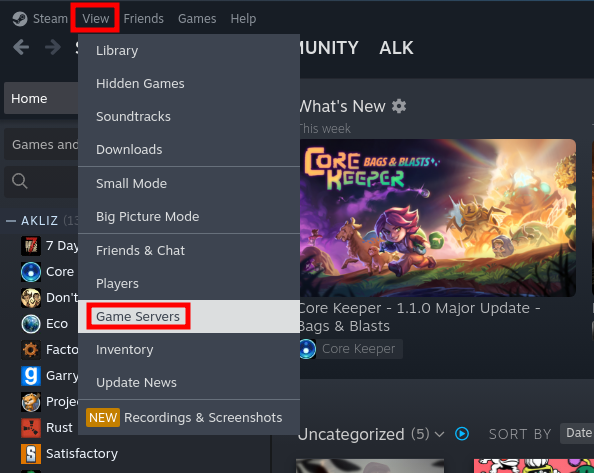
Step 2: Join via the Steam servers favorites list
- In the Steam application, click "View" at the top, then click "Game Servers" in the drop-down menu.
- Click the "Favorites" tab in the window that opens.
- Click the "+" icon near the bottom of that window, and enter your IP address and port in this format:
8.48.32.72:24627
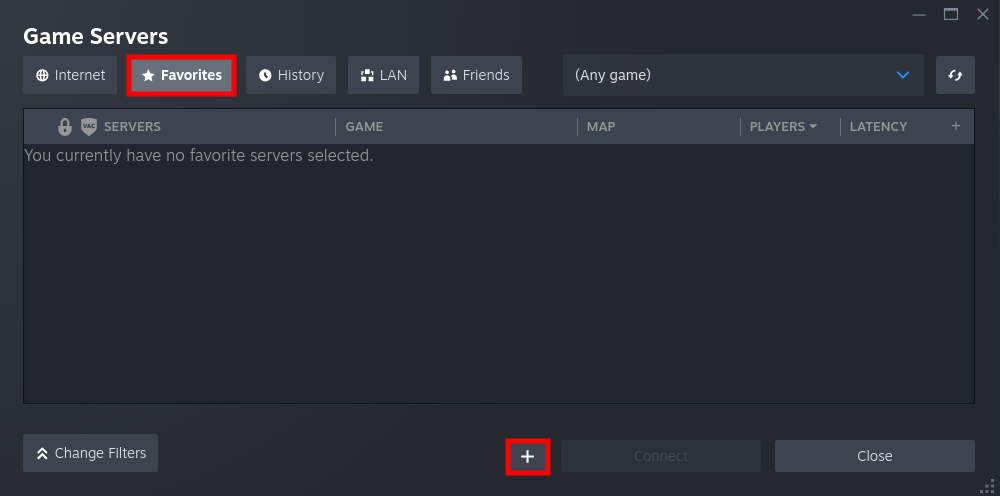
- Once the server shows up in the list, click it then click "Connect". The game will launch and automatically connect to the server.
Customizing your ARK Server
ARK has several options you can customize and features you can enable. Here are some of the most common:
How to Edit ARK Server Configuration
Most of ARK's settings can be found in the two files GameUserSettings.ini and Game.ini. These can be found and edited in the Files tab of your server, at the path here: ShooterGame/Saved/Config/LinuxServer/ Here's how to edit those:
- From the Console page of your server, click on the Files tab.
- Navigate to the path listed above, then open one of the files by clicking on it.
- Modify the parts of the file you want to change. A full list of options can be found on the official wiki.
- Click "Save" at the top of the window.
- Restart your server.
And that's it! For a full guide on that process, along with some useful examples, check out our full guide here.
How to Install Mods to your ARK Server
ARK has a large selection of mods that you can install on your server to enhance the gameplay and keep it feeling fresh. Here's how:
You'll need to install the mods you want to your game first. You can do this through the Steam Workshop. Navigate to the Steam Workshop via the "Workshop" button on ARK's game page, find the mod you want, then click the green "Subscribe" button to install the mod.
After you have all of the mods you want installed on your end, you'll need to install them in the server. This is a multi-step process, so check out our full guide here on how to do that.
How to Use Commands on your ARK Server
Commands can help with a lot of things, like cheating in something you lost, traveling very quickly as an admin to another player, or many other things.
To use any command in your server, you first need permission. The easiest way to do this is to set an admin password. Here's how to do that:
- Open the GameUserSettings.ini file in Command Center.
- Find the line for the
ServerAdminPassword=setting. If it is not present, add the line in the section directly underneath the[ServerSettings]header. After the=, type in the password that you want to use. - Click Save to save your password settings. Settings will not be applied until the server is restarted.
- Restart your server, and when you rejoin you can use the in-game console to send commands.
Once you do that, you are ready to actually use your commands. Here's how:
- Connect to your ARK server.
- Open the in-game console. The default key-binding is TAB, but you can change it to anything else. On some platforms, it might be the Tilde key.
- If you are using the admin list, you can skip this step. Otherwise, you need to use the command to enable cheats to use cheat commands:
enablecheats MyPassword. ReplaceMyPasswordwith the password you have set.
For a list of all cheats and commands, we suggest checking the ARK wiki. Any command labeled with Cheat: Yes will require you to prefix your cheat command with the word cheat or admincheat unless you are connected to your server as an admin. For example, to enable flying, you would use cheat fly.
The full list of ARK commands can be intimidating because there are so many different commands. You can also use tools like ARK IDs admin command list to find the commands you need.
How to Enable RCON on your ARK Server
For an introduction to what RCON is, see this article.
Once you have your server created, there are only a few steps to enable and connect with RCON to send commands to your server remotely.
Open a Port for RCON
- Click "Manage" next to your server in the Command Center to open your server's page. Then click the gear tab at the top left and click "Port Forwarding".
- In the "Request Port" section, open the dropdown menu and select "Other". Don't change anything in the 2 text boxes.
- Make sure the Protocol is TCP.
- Click the "One to One" check box so it is checked.
- Click "Add Port". Your new port will be the last one in the list. Both private and public ports should be the same. If they are not, make a new port and make sure "One to One" is checked.
- Remember or copy the new port. You'll need it in the next steps.
Enable RCON
- In Command Center, open your server and click on the "Files" tab.
- Navigate to and open the file
/ark-survival-evolved/ShooterGame/Saved/Config/LinuxServer/GameUserSettings.ini - Under the [ServerSettings] section (the top one), after the other lines, add a line that says
RCONEnabled=True - If the line
ServerAdminPassword=is not present, add that as well on its own line and set a password. Use only numbers and letters. This will be your RCON password as well as the server admin password. - Find the line
RCONPort=(usually on line 5) and add the port you created at the end with no space. - Start or restart your server and the changes will go into effect.
That's it! RCON is now enabled and ready to use. To learn how to connect with RCON, see this article. The full list of ARK commands can be intimidating because there are so many different commands! You can also use tools like ARK IDs admin command list to find the commands you need. And as always, if you need any help, contact us with the chat bubble on the bottom right of the page.
Common Issues and How to Solve Them
As with everything, sometimes ARK servers can run into issues. To help with this, we have a number of help articles and an experienced support team to make sure you have the smoothest experience possible. Here are some of the most common issues and how to solve them.
[S_API FAIL] SteamAPI_Init() failed; SteamAPI_IsSteamRunning() failed.
When hosting your ARK server, you may see this error in your console. This is normal, and can be ignored. Even when your server starts up successfully and is ready to join, you may still see this error. If you can't join your server, make sure to reach out via our live chat and we can help!
Unable to Join the Server using the Epic Launcher
Joining your ARK server is a slightly different process if you are using the Epic Games Launcher. We have a guide here on how to join when you launch the game through Epic.
Unable to Join the Server using a Xbox or PC Game Pass Copy of ARK
ARK: Survival Evolved has crossplay enabled between Steam and Epic copies of the game, but the Xbox or Game Pass for PC version of the game has no crossplay between Steam or Epic. You will need to purchase the game through Steam or Epic to connect to your server.
Start Hosting your ARK: Survival Evolved Server Today!
Akliz offers tons of benefits over hosting locally or other solutions. Our Command Center is powerful and simple and lets you skip the nonsense and get straight to the game. Our hardware is some of the best in the business and our support is top notch. You can't go wrong, no matter what game you play.
If you want to host a server for another game, we let you switch games under a single plan, as long as you have enough RAM. Check out all of the games we host below!

Updated 8 months ago