Using RCON Commands with rcon-cli
rcon-cli
rcon-cli is a very basic application that can be used to send rcon commands to your server.
Here is a link to their github: https://github.com/gorcon/rcon-cli
And here is a link to the downloads: https://github.com/gorcon/rcon-cli/releases
Download whichever file is relevant to your system (for example, the win64.zip for Windows computers) and unzip it into wherever you want to run it from.
How to use rcon-cli in Windows
- Enable RCON for your game. This is different for every game so make sure to check out the help articles for whichever game you want to use. You can see all rcon articles here.
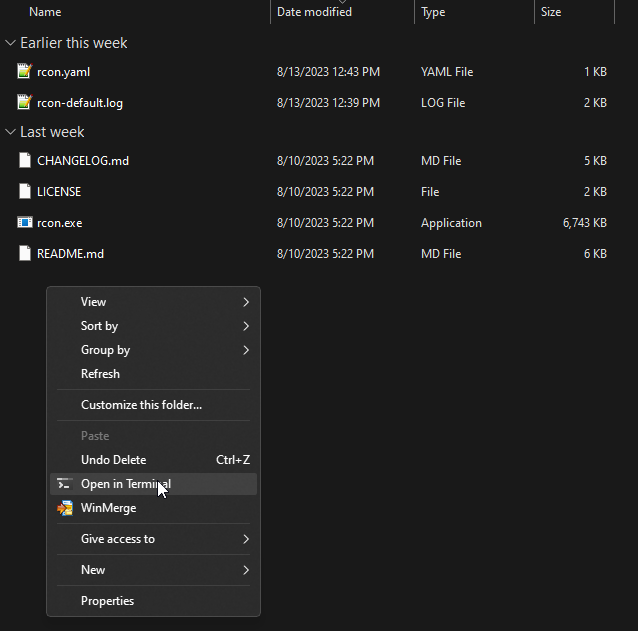
- Navigate to the unzipped folder where you can see rcon.exe
- CTRL + Right Click inside the window (not on any file) and click "Open in Terminal"
- If you don't see "Open in Terminal", try pressing CTRL + Shift + Right Click instead and open the folder in a Powershell window. It works the same, for this purpose.

- Type the following command:
.\rcon.exeand press enter.- For 7 Days to Die, add
-t telnetto the end of the command (with a space separating them) or set the type to telnet in the config file. - For Rust, add
-t webto the end of the command (with a space separating them) or set the type to web in the config file.
- For 7 Days to Die, add
- Type the IP and port in this format:
ip:portand press enter.- Remember that the port you want is not usually the port found at the top of the page of the command center. It is the port you have set or that was set for you for RCON. (Garry's Mod, Team Fortress 2, and other source engine games use the default game port for RCON.) If you don't remember what port this is, contact support and we can tell you.
- Enter your RCON password and press enter.
Now you should be connected to your server via rcon. To disconnect, simply close the terminal window or type the command :q. Don't hesitate to contact us if you have any questions about using or connecting to RCON, and have a look at the game-specific RCON articles for more information.
For more advanced options and usage (such as separate environments for different servers), check out the rcon-cli github, where they have explanations for all available commands, options, and usage.
rcon-cli Config File
There is a config file that comes with the application. For the most part, you can leave it as is without changing it at all. But if you are connecting to the same server over and over, this can be very useful. This is not an exhaustive list, for more information check out the rcon-cli github. Here are the main 3 options you might want to change.
address: You can enter the ip:port into this field (inside the provided quotation marks) and the application will automatically attempt to connect to the server when you start it.
password: This works just like the address option, enter your password and it will automatically use it when connecting.
type: this can be changed if the game you are logging into requires a different type of connection. For example, instead of adding -t telnet to your command when connecting to a 7 Days to Die server, you can simply write telnet in the quotation marks of this file and it should use that type every time you run the application.
Updated 3 months ago
