How to Set Up a Minecraft Server
Your Comprehensive Guide to Hosting with Akliz
Why Host a Minecraft Server?
Hosting your server with Akliz has several huge benefits over playing without a server, hosting yourself, and even hosting with another host.
- Performance: Using a dedicated server can drastically improve performance on your computer, since many of the game processes are offloaded from your computer to the server.
- Easy Control over gameplay settings and mods: With an Akliz server, you have full control over your game and modpack settings, as well as which mods your server runs.
- Opportunities to play with friends and build community: Having a server is great for playing with friends. The server can be online 24/7, so even when your computer is off, your friends can play. Growing an active community is easy when everyone has a server to hang out in!
- Simplify Your Server: Our in-house server management site, the Command Center, makes managing your server easy without restricting what you can do. Whether you're brand new to server hosting or a seasoned veteran, you will find our site easy to use and powerful at the same time.
- Reliable Backups: Included with all of our plans is our Vault system, which automatically makes backups of your server so you don't have to worry about losing your world if disaster strikes.
- No Hidden Fees: We charge you one price for your plan. There are no features locked behind a paywall, like mod support, storage space, automatic and manual backups, premium support chat, or anything else.
- Powerful Hardware: No matter what plan you choose, you get the same powerful server hardware. You don't have to pay extra to get the best we have to offer.
What You Need to Start Hosting Your Minecraft Server
Before you get started, here are a few things you will need to play on your Minecraft server:
- Minecraft account: Ensure you own a copy of Minecraft with a valid Microsoft account. (If you can already play Minecraft, you have this covered.) This guide will be focusing on the Java edition of Minecraft. If you want a Bedrock server, click here.
- Akliz Hosting Plan: Choose a suitable hosting plan based on your needs. Some servers may need more than others. Check out the pricing page here to purchase one, or contact support via the chat bubble on the bottom right of the site if you don't know which plan is right for you.
- Internet Requirements: Make sure you have a stable internet connection. Almost all broadband connections should be able to play easily. You can test your ping to our servers using our free sample servers here!
- A Computer to Run Minecraft: Minecraft is a pretty easy game to run. Most modern computers can run it. However, some modpacks can have some extra requirements like extra RAM or a more powerful CPU in your PC. If you have any trouble running the game, don't hesitate to contact support!
Step-by-Step Guide to Setting Up the Minecraft Server
Step 1: Sign Up for Akliz Hosting
- Create an account here.
- Navigate to the Pricing Page and choose the plan that's right for you. Check out our modpack list for RAM requirements for each pack if you haven't already.
- Click "Buy Now" next to the plan you want.
- Take a look at everything in the Plan Overview section and make sure all of your choices look good. (Hint: you can get a discount by choosing a term for your plan longer than 1 month!)
- Click Next.
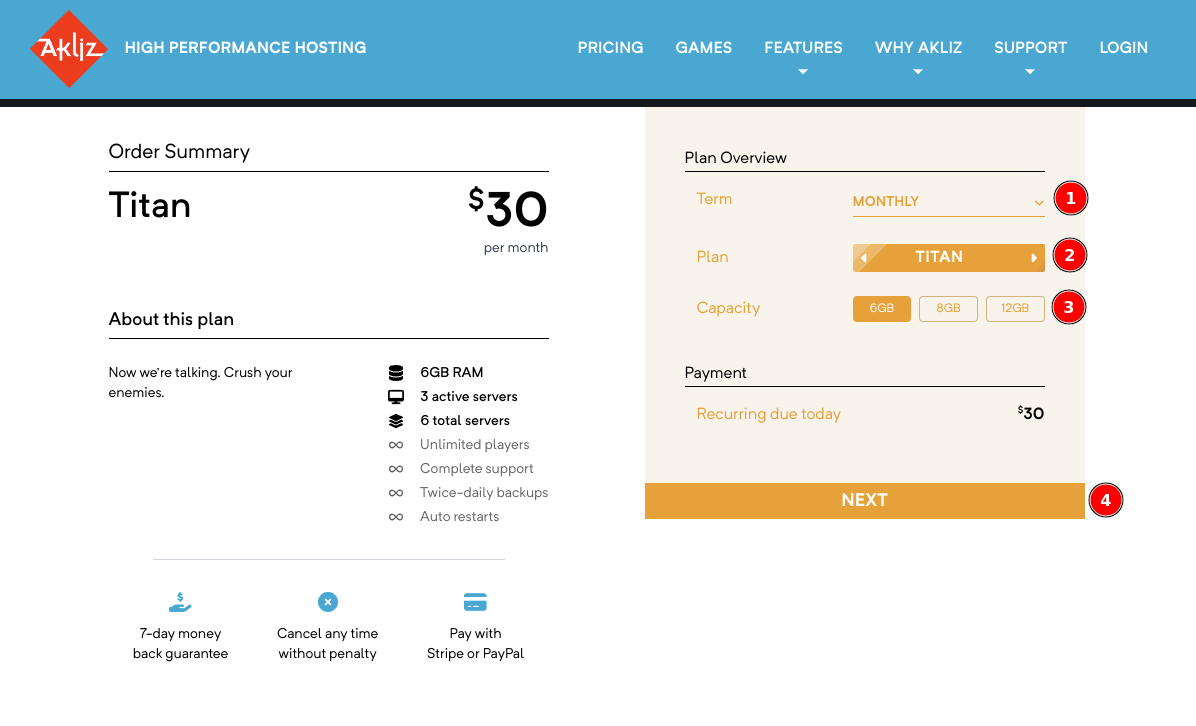
- Add a payment method. This can be a credit/debit card or PayPal.
- Click "Pay Now" to finalize your payment and start your plan!
Step 2: Access the Command Center
- Navigate to the Command Center and make sure you are still logged in.
- This will bring you to your Servers page. Here you will be able to see a list of any servers you have created.
Step 3: Create a New Minecraft Server
With any Akliz plan, once you have a plan you can start creating servers. These servers, when started, use your purchased RAM. You can see how much RAM you have used and available, as well as how many servers you can create and run on the left side of the Servers page.
- Now that you're in the Servers page, you should see a button at the top left labeled "Create a Server". Clicking that button will bring you to a list of games available for installation.
- Select "Minecraft" from the list of available games.
- For normal vanilla Minecraft, choose the Minecraft option under "Minecraft - Java Edition". We will go over modded servers later on this page.
- On the next page, you will be able to create a friendly address that will be used to connect to your server. You can put anything you'd like here, as long as it's not already taken.
- In the same page, you can choose your RAM. The default is the minimum amount required for the game, but if you bought a plan with extra RAM, you can increase this up to the amount you purchased.
- Confirm the configuration and click "Create" to initialize the server.
- Once it is created, you can start your server by clicking the blue "Play" icon, or click on "Manage" next to your server to see the console and other info, and you can click "Start" at the top right of the page. Your server needs to be started before you can join.
How to Join Your Minecraft Server
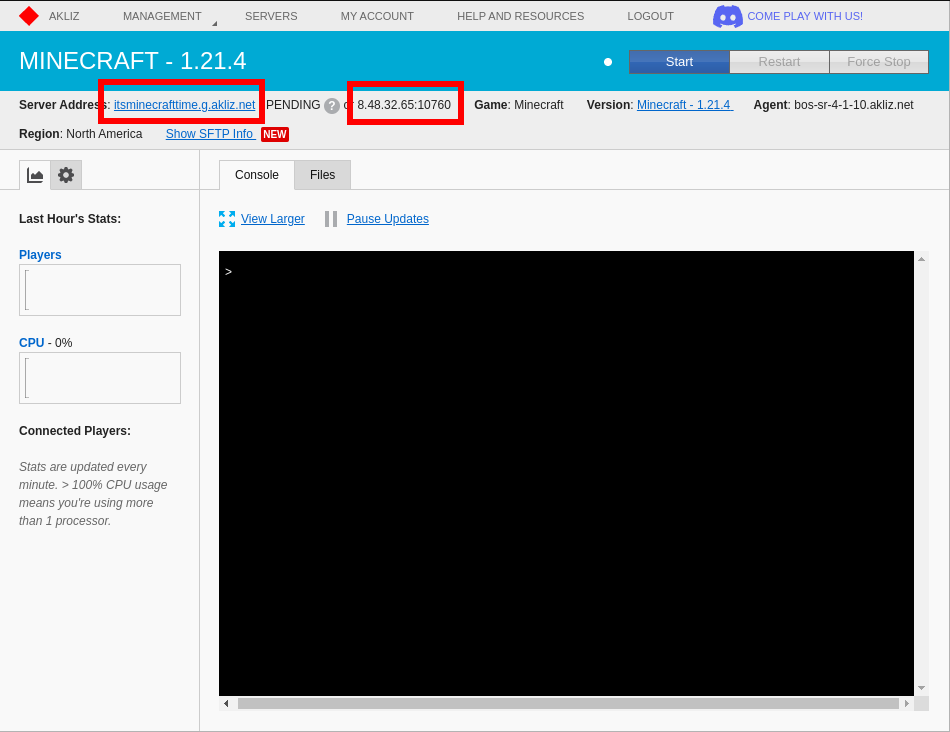
Step 1: Locate the server address in the Akliz Command Center.
You can use your friendly address or your direct IP address. This can be found in your servers list, or on the console page for your server.
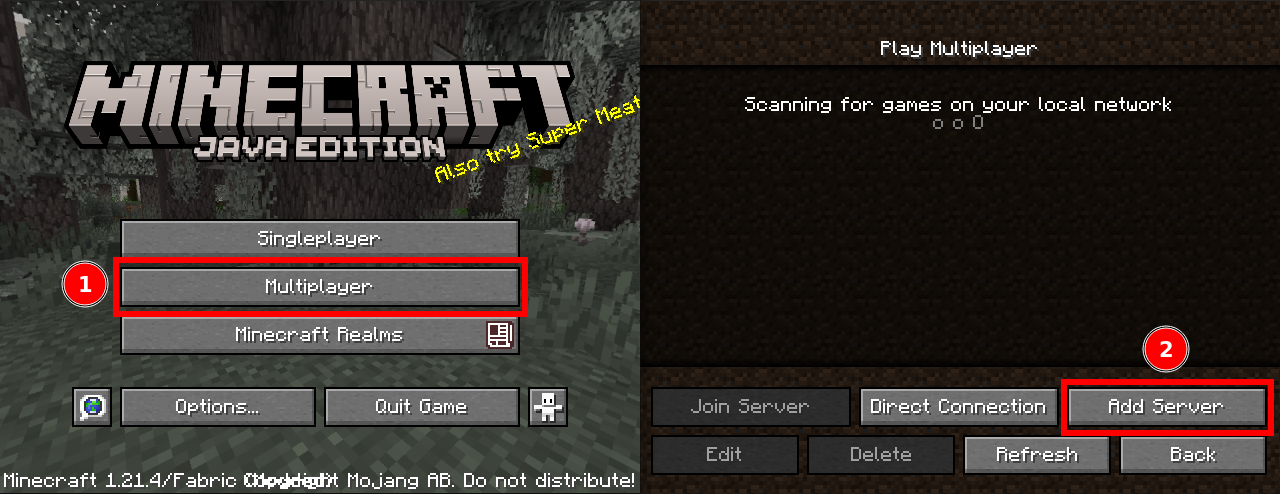
Step 2: Launch Minecraft and go to the "Multiplayer" menu.
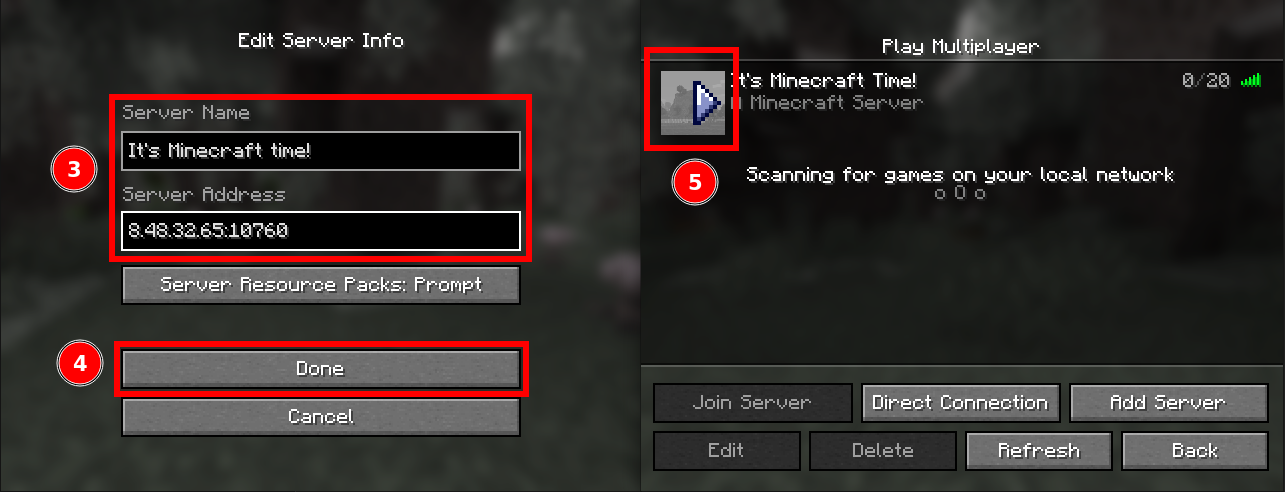
Step 3: Click "Add Server" then enter your server's address and an optional name, then click "Done" and join your server by hovering over the icon and clicking the join arrow.
How to Install a Modded Minecraft Server
Modding Minecraft can breathe new life into the game and add tons of fun features. Before you create a server, check out the difference between mods and modpacks.
- Mods: Individual files that add new or modify existing game features.
- Modpacks: Collections of pre-configured mods bundled together for ease-of-use.
Instructions on Installing Modpacks
-
Get a Launcher: The easiest way to play modded Minecraft is to get a launcher. Popular launchers that host modded content are Curseforge Launcher, Technic Launcher, and the FTB App.
- Third-party launchers also exist, such as Prism Launcher and others, which work with all 3 major modpack distributors, but are more complicated to use.
-
Install a Modpack: To install a modpack, simply open your desired launcher and (optionally) sign in.
- For Curseforge, navigate to the Minecraft section, then click browse near the top.
- In the list of available modpacks, search for or select one and then click Install.
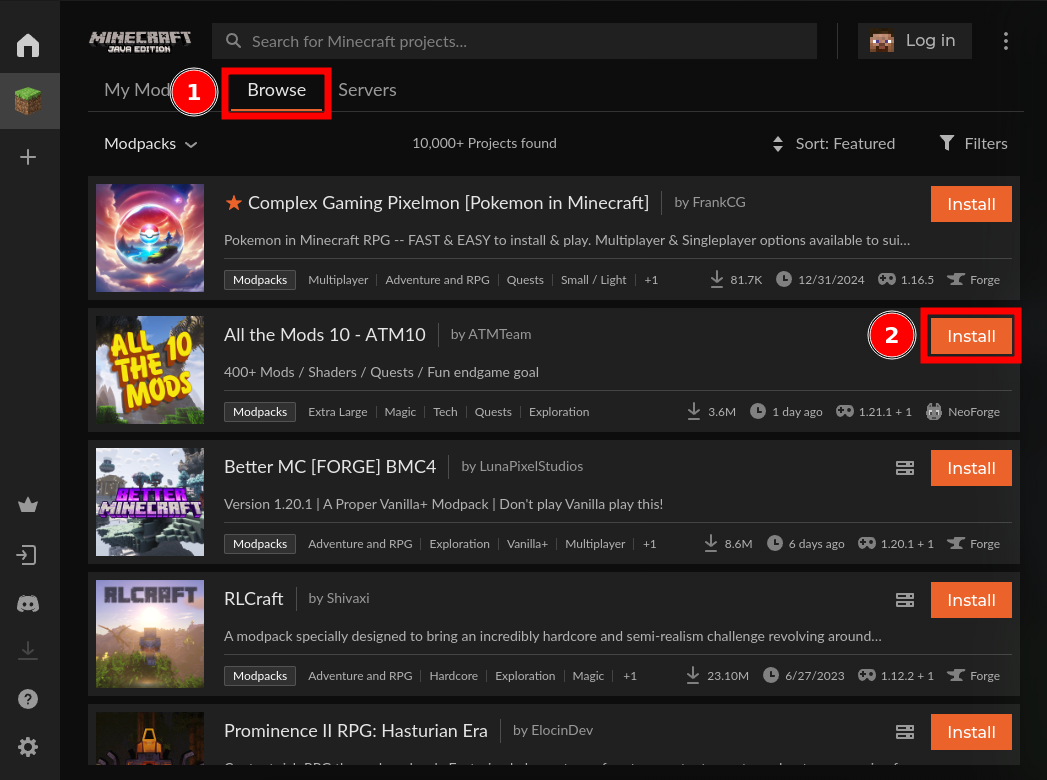
- Once your modpack is finished installing, you can launch it.
- When using the Curseforge Launcher, you may need to sign in with your Microsoft account in the Minecraft window that appears after you launch the modpack.
Installing Individual Mods
- If you want to install additional mods to an existing modpack, check out this guide.
- If you want to create a modpack from scratch, check out this guide. Warning: this is for advanced users only.
Common Issues and How to Solve Them
As with everything, sometimes Minecraft servers can run into issues. To help with this, we have a huge number of help articles and an experienced support team to make sure you have the smoothest experience possible. Here are some of the most common issues and how to solve them.
- Crashing or Freezing when Joining a World: If you are using a large modpack, make sure to increase the amount of RAM allocated to your game. Without enough RAM, the game may freeze or crash when joining a server or world. You can see how to increase RAM in this guide. Note that this is for your local game, and not the server.
- Unknown Host or Timed Out: More often than not, this means the address was typed incorrectly. This can also happen when a space was accidentally pasted with the address. Double check for spaces before or after the address, and also try the direct IP instead of the friendly address. If those options don't work, contact support and we can help.
- "Flying is not Enabled on this Server": This is a common issue in some modpacks. To fix this, you can follow this section of our Minecraft server.properties guide.
- For a list of other common Minecraft issues, check out this guide.
- If you still have questions, make sure to contact our support chat in the bottom right corner of the website! We are always glad to help with any questions you may have, big or small.
Start Hosting your Minecraft Server Today
Akliz offers tons of benefits over hosting locally or other solutions. Our Command Center is powerful and simple and lets you skip the nonsense and get straight to the game. Our hardware is some of the best in the business and our support is top notch. You can't go wrong, no matter what game you play.
If you want to host a server for another game, we let you switch games under a single plan, as long as you have enough RAM. Check out all of the games we host below!
Updated about 15 hours ago


