
Adding and Removing Admins from your Core Keeper Server
There are 2 ways to add and remove admins from your server. The first person to join the server after it was created automatically becomes admin. You can change this, however.
Add and remove admins in-game
The in-game admin feature is relatively straight forward. Once you are connected to your server, you will see a list of online players.

If you are already an admin (being the first player to connect), you can add or remove other admins. Just click the gray star next to someone's name to add them as an admin. Or click the gold star to remove them. You cannot remove yourself, or the "first admin" in-game. See the next method to remove admins manually if you cannot in-game.
You can also click "Manage players" on the left to see a list of admins and banned players, which you can manage.
Add and remove admins in the server config
- In Command Center, navigate to
/core-keeper/DedicatedServer/Admins.json - You will see the "first admin" listed here. The player who joined the server first and was automatically given admin.
- Add this text inside the "adminList" section, below the 2nd to last curly bracket, before the straight bracket:
{ "index": 2, "privileges": 2, "name": "characternamehere", "steamId": SteamID } - Find the Steam ID of the player you want to add as admin, and add it, replacing "SteamID" in the example.
- Replace "characternamehere" with the in-game character name of the person you want to be an admin. Make sure the name is in quotes.
- Privileges can be 2 or 1. 2 is as high as the "first admin" and admins with privilege 1 cannot remove admins with privilege 2. Adding admins in-game adds them as privilege 1.
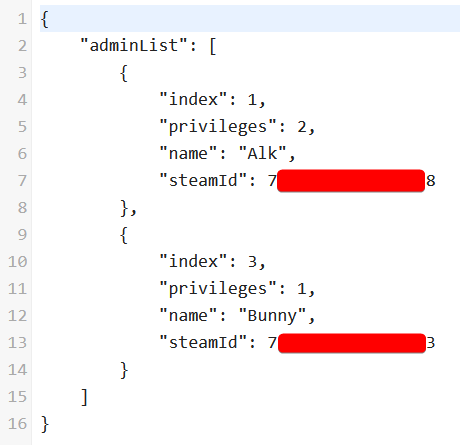
After adding an admin, the file should look something like this:
And that's it! To remove an admin, simply delete the segment of code including the 2 curly brackets right above and below their admin details.

Updated 8 months ago