How to Add Mods to Project Zomboid Server | Akliz
Easily add mods to your Project Zomboid server with our step-by-step guide. Customize your gameplay with mods in just a few simple steps. Start now!
Adding mods to Project Zomboid is simple once you have the right information.
Follow this guide to customize your server and enhance your gameplay.
Stop and Backup!
Before making any changes, stop your server and create a backup using the Backups feature. This ensures you can restore your server if needed.
Step-by-Step Guide: Adding Mods to Your Project Zomboid Server
Follow these steps to add mods seamlessly to your Project Zomboid server:
- Set Up Your Admin Password
Start your server and set up your Admin password in the console. - Find Mods in the Steam Workshop
Browse the Steam Workshop to locate the mods you want to add. On each mod's workshop page, note the Workshop ID and Mod ID listed towards the bottom, just above the discussion section.

- Navigate to the
servertest.inifile
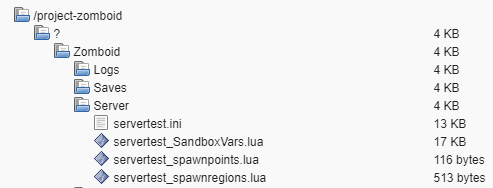
Find theservertest.inifile in/project-zomboid/?/Zomboid/Server

- Add the Workshop and Mod IDs
Find the following sections and enter in the appropriate Workshop and Mod IDs, making sure to separate the entries with a semicolon (;) as stated in the file:
# List Workshop Mod IDs for the server to download. Each must be separated by a semicolon. Example: WorkshopItems=514427485;513111049
WorkshopItems=2313387159# Enter the mod loading ID here. It can be found in \Steam\steamapps\workshop\modID\mods\modName\info.txt
Mods=BetterSortCC- Save
Save your changes to theservertest.inifile. - Restart
Restart your server to load the new mods.
FAQs About Project Zomboid Mods
Can You Add Mods to an Existing Project Zomboid Server?
Yes, you can add mods to an existing Project Zomboid server! Simply follow the steps above, ensuring the Workshop IDs and Mod IDs are correctly entered. After adding the mods, restart your server to apply the changes. Players will need to have the same mods installed on their clients to join without issues.
Can You Add Mods Without Restarting the Server?
No, you must restart the server to load new mods. Any changes to the servertest.ini file or newly added mods will only take effect after a restart. Always back up your server files before making changes.
Updated 3 months ago

