
Change the Server Settings for 7 Days to Die
The serverconfig.xml can be a bit overwhelming; here's a quick guide to help you find it in Command Center and get you started on what you’ll want to change. They're already in the config, you just have to find them and change them to what you need. We also suggest keeping a backup of this on your computer.
Stop Your ServerWhenever editing files on your server, we always recommend stopping your server first.
Find serverconfig.xml in Command Center
- Log into Command Center and click on
Managenext to your 7 Days to Die server.

- Click on the
Filestab and then onserverconfig.xml

Edit serverconfig.xml
Following are some of the most used settings for your server:
Server Identification
ServerName
xml <property name="ServerName" value="My Game Host"></property>
This is where you’ll change the name of your server. “My game Host” to the name that you’ll want to show up on the list.
ServerDescription
xml <property name="ServerDescription" value="A 7 Days to Die server"></property>
This controls the server description, this also shows up when you click on the server before connecting to it. You’ll want to change “A 7 Days to Die server” to your server description.
Server General Settings
ServerPassword
xml <property name="ServerPassword" value=""></property>
This is to add a password to your server, you’ll want to add the password between the " ". if you want to keep it to only those that know the password can join. If you want a more secure way to have it so only those that are whitelisted can join please follow this article here.
ServerVisibility
xml <property name="ServerVisibility" value="2"></property>
Changing this to a 1 will make it so only friends of you can see the server once you’re connected to it. You’ll have to connect to it manually using the IP. Changing this to a 0 will make your server completely unlisted. It’s suggested that you keep it a 2 or a 1 that way you know people can connect.
ServerMaxPlayerCount
xml <property name="ServerMaxPlayerCount" value="8"></property>
Changing the max player count will affect how your server can perform. Make sure you have enough RAM allocated to your server to make sure things run smoothly.
PlayerKillingMode
xml <property name="PlayerKillingMode" value="3"></property>
This is how you can adjust the PVP to be on the server. 0 being no PVP, 1 being PVP your allies, 2 being PVP non allied, and 3 PVP everyone.
EACEnabled
xml <property name="EACEnabled" value="false"></property>
This is the setting that enables or disables Easy Anti-Cheat, or EAC, on your server. You may want to disable this for various reasons. Some mods require EAC to be disabled, some users may not want kernel-level anti-cheat installed on their systems, or if their system is not compatible with EAC.
World
You can easily change you world for your 7d2d server. The default for all worlds is the Navezgane map. We do have PREGEN6k, PREGEN8k, PREGEN10k, prebuilt into the system. If you were to set up a RWG (Random World Gen) you would put that in there. Please note if you do RWG, it does take a long time to generate. We highly suggest you uploadupload a map to your server.
GameWorld
xml <property name="GameWorld" value="Navezgane"></property>
WorldGenSize
xml <property name="WorldGenSize" value="6144"></property>
This is how big the map is, the biggest being 16384. The bigger the map the longer it takes to load. The default for Navezgane is 6144. The general rule with map size is double the RAM for each bump up. So please keep your plan in mind.
Game & Sandbox Settings
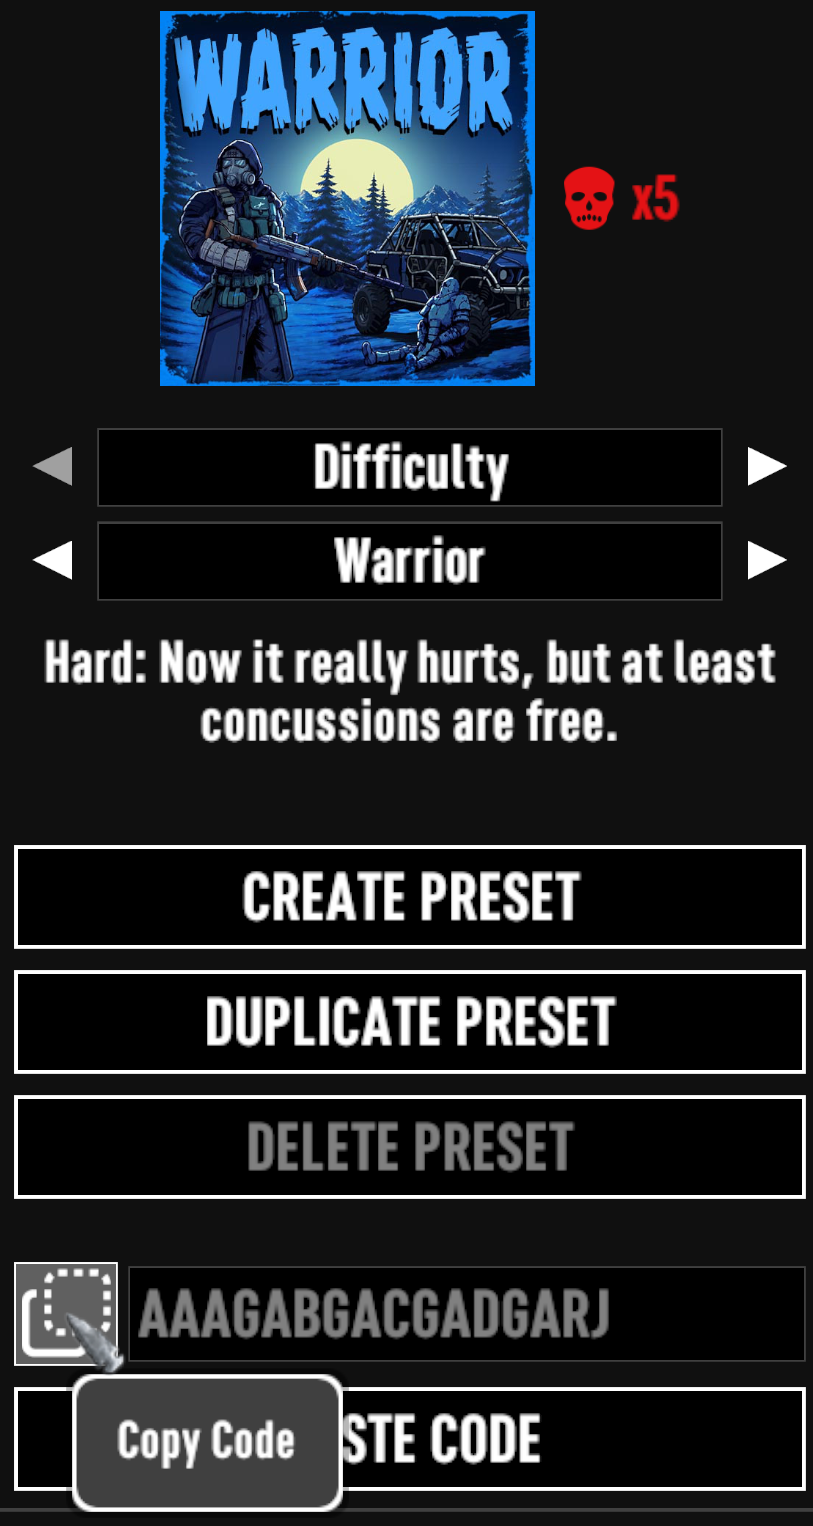
As of 3.0, all game & sandbox settings are handled in a single property:
xml <property name="SandboxCode" value="AAAJABJACJADJARFBNC"></property>
By default, this code is set to the "Adventurer" difficulty setting.
To change the difficulty or use custom settings:
-
Launch 7 Days To Die, go to "Play Game", and then "New Game"
-
Select "Sandbox Options"
-
Select the difficulty preset you'd like from the selector, or change the sandbox settings to create your own custom difficulty.
-
In the bottom left, it will generate a Sandbox Code that reflects the options you've set. Click the "Copy Code" button to copy that code to your clipboard.
-
You can now paste that code into the "SandboxCode" value in the serverconfig file.
Restart Your Server
After you are done making any changes and saving those changes, you'll need to restart/start your server.


Updated 23 days ago