
How to Set Up a 7 Days to Die Dedicated Server
Host a high-performance 7 Days to Die server with ease using Akliz.

Why Host a 7 Days to Die Server?
Hosting your server with Akliz has several huge benefits over playing without a server, hosting yourself, and even hosting with another host.
- Performance: Using a dedicated server can drastically improve performance on your computer, since many of the game processes are offloaded from your computer to the server.
- Easy Control over gameplay settings and mods: With an Akliz server, you have full control over your game and mod settings, as well as which mods your server runs.
- Opportunities to play with friends and build community: Having a server is great for playing with friends. The server can be online 24/7, so even when your computer is off, your friends can play. Growing an active community is easy when everyone has a server to hang out in!
- Simplify Your Server: Our in-house server management site, the Command Center, makes managing your server easy without restricting what you can do. Whether you're brand new to server hosting or a seasoned veteran, you will find our site easy to use and powerful at the same time.
- Reliable Backups: Included with all of our plans is our Vault system, which automatically makes backups of your server so you don't have to worry about losing your world if disaster strikes.
- No Hidden Fees: We charge you one price for your plan. There are no features locked behind a paywall, like mod support, storage space, automatic and manual backups, premium support chat, or anything else.
- Powerful Hardware: No matter what plan you choose, you get the same powerful server hardware. You don't have to pay extra to get the best we have to offer.

What You Need to Start Hosting Your Server
Before you get started, here are a few things you will need to play on your 7 Days to Die server:
- 7 Days to Die Game License: Ensure you own a copy of 7 Days to Die with a valid Steam account.
- Akliz Hosting Plan: Choose a suitable hosting plan based on your needs. Some servers may need more than others. 7 Days to Die servers require a minimum of 6GB to run, so you'll need to have a Titan plan. Check out the pricing page here to purchase one.
- Internet Requirements: Make sure you have a stable internet connection. Almost all broadband connections should be able to play easily.
- A Computer to Run 7 Days to Die: 7 Days to Die requires a gaming computer to run. Most gaming computers can run it. The minimum requirements are:
- Windows 10 or later (64-Bit)
- 2.8 Ghz Quad Core CPU
- A Graphics Card with 2 GB Dedicated Memory
- 8 GB RAM
How to Set Up Your 7 Days to Die Server with Akliz
Step 1: Sign Up for Akliz Hosting
- Create an account here.
- Navigate to the Pricing Page and choose the plan that's right for you. You will need the 4GB Hero plan at a minimum, though servers with large amount of players may want a larger plan.
- Click "Buy Now" next to the plan you want.
- Take a look at everything in the Plan Overview section and make sure all of your choices look good. (Hint: you can get a discount by choosing a term for your plan longer than 1 month!)
- Click Next.
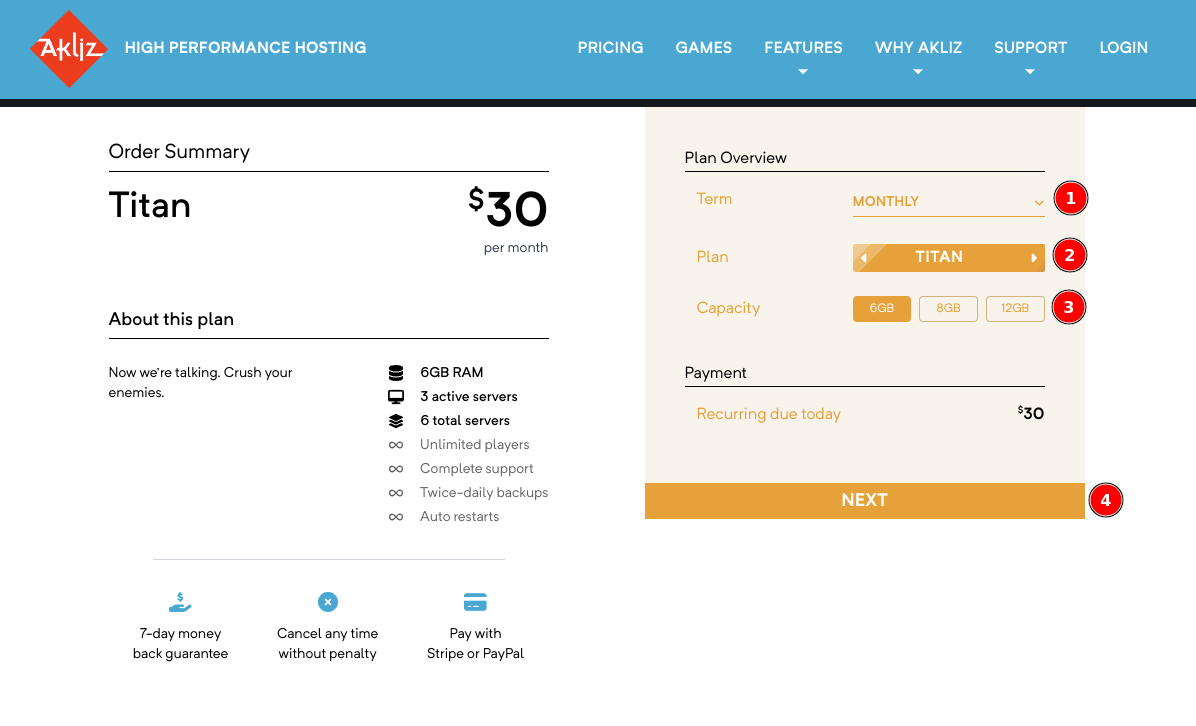
- Add a payment method. This can be a credit/debit card or PayPal.
- Click "Pay Now" to finalize your payment and start your plan!
Step 2: Access the Command Center
- Navigate to the Command Center and make sure you are still logged in.
- This will bring you to your Servers page. Here you will be able to see a list of any servers you have created.
Step 3: Create a New 7 Days to Die Server
With any Akliz plan, once you have a plan you can start creating servers. These servers, when started, use your purchased RAM. You can see how much RAM you have used and available, as well as how many servers you can create and run on the left side of the Servers page.
- Now that you're in the Servers page, you should see a button at the top left labeled "Create a Server". Clicking that button will bring you to a list of games available for installation.
- Select "7 Days to Die" from the list of available games.
- You may choose either the current 7 Days to Die release, or the Experimental version, if an Experimental update is available.
- On the next page, you will be able to create a friendly address that will be used to connect to your server. You can put anything you'd like here, as long as it's not already taken.
- In the same page, you can choose your RAM. The default is the minimum amount required for the game, but if you bought a plan with extra RAM, you can increase this up to the amount you purchased.
- Confirm the configuration and click "Create" to initialize the server.
- Once it is created, you can start your server by clicking the blue "Play" icon, or click on "Manage" next to your server to see the console and other info, and you can click "Start" at the top right of the page. Your server needs to be started before you can join.

How to Join Your 7 Days to Die Server
Step 1: Find the server’s IP address in the Akliz Command Center
- Click "Manage" next to the name of your server in Command Center
- The IP address and Port will be listed on the top of the page, next to your Friendly Address.
Step 2: Launch 7 Days to Die, go to the “Join A Game” menu.

Step 3: Click "Connect to IP...", enter your IP and Port into their respective fields, then click "Connect"
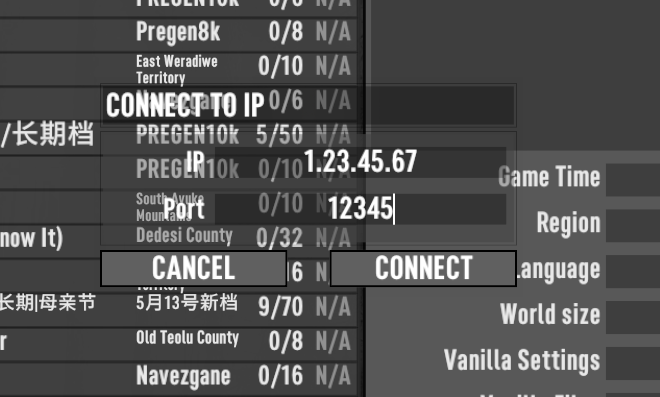
The next time you start the game, you can simply click "CONTINUE" in the main menu and it will connect you to the last session you connected to.
Customizing Your 7 Days to Die Server
There are two primary ways you can configure your 7 Days To Die server to fit your needs. First, you can edit the serverconfig.xml file to select your map and adjust the game settings. Secondly, you can add mods to your game that expand and enrich your experience.
Find serverconfig.xml in Command Center
- Log into Command Center and click on
Managenext to your 7 Days to Die server.

- Click on the
Filestab and then onserverconfig.xml

Following are some of the most used settings for your server:
Server Identification
ServerName
xml <property name="ServerName" value="My Game Host"></property>
This is where you’ll change the name of your server. You can change “My Game Host” to any name that you’ll want to show up on the in-game server list.
ServerDescription
xml <property name="ServerDescription" value="A 7 Days to Die server"></property>
This controls the server description, this also shows up when you click on the server before connecting to it. You’ll want to change “A 7 Days to Die server” to your server description.
Server General Settings
ServerPassword
xml <property name="ServerPassword" value=""></property>
This is to add a password to your server, you’ll want to add the password between the " ". Any player with this password will be able to connect to your server. If you want a more secure way to have it so only those that are whitelisted can join please follow this article here.
ServerVisibility
xml <property name="ServerVisibility" value="2"></property>
Changing this to a 1 will make it so only friends of you can see the server once you’re connected to it. You’ll have to connect to it manually using the IP. Changing this to a 0 will make your server completely unlisted. It’s suggested that you keep it a 2 or a 1 that way people you know can connect.
ServerMaxPlayerCount
xml <property name="ServerMaxPlayerCount" value="8"></property>
Changing the max player count will affect how your server can perform. Make sure you have enough RAM allocated to your server to make sure things run smoothly.
PlayerKillingMode
xml <property name="PlayerKillingMode" value="3"></property>
This is how you can adjust the PVP to be on the server. 0 being no PVP, 1 being PVP your allies, 2 being PVP non allied, and 3 PVP everyone.
GameDifficulty
xml <property name="GameDifficulty" value="2"></property>
The default difficulty of the game is set at a 2, from 1 to 5, and 5 being the hardest.
World
You can easily change you world for your 7d2d server. The default for all worlds is the Navezgane map. All Pregen worlds are included on the server automatically.
RWG WorldsPlease be aware, RWG worlds cannot be generated server-side. If you want to use an RWG world, you will need to generate it locally and upload the map to your server.
GameWorld
xml <property name="GameWorld" value="Navezgane"></property>
WorldGenSize
xml <property name="WorldGenSize" value="6144"></property>
This is how big the map is, the biggest being 16384. The bigger the map the longer it takes to load, and the more RAM that the server requires. The default map, Navezgane, is size 6144. The general rule with map size is an additional +2GB for each step up in map size, so please keep that in mind.
Restart Your Server
After you are done making any changes and saving those changes, you'll need to restart/start your server.
Common Issues and How to Solve Them
My RWG world won't load!
When uploading a world, there are two sets of files that will need to be uploaded - the World folder, and the Saves folder. Make sure both are uploaded, and that they're in the correct location, as specified in our world upload guide.
I changed the difficulty settings, and now the server won't start!
The Serverconfig file for 7 Days To Die has to be 100% valid, or else it will crash when attempting to load. Make sure that you haven't accidentally removed any quotation marks, and that any settings are within the acceptable bounds - for example, PvP mode can only be set to 0, 1, 2, or 3, so setting it to 4 will cause a crash. If you're not able to figure out what's causing the crash, please open a support ticket, and we're happy to take a look.
Start Hosting Your 7 Days to Die Server Today
Akliz offers tons of benefits over hosting locally or other solutions. Our Command Center is powerful and simple and lets you skip the nonsense and get straight to the game. Our hardware is some of the best in the business and our support is top notch. You can't go wrong, no matter what game you play.
If you want to host a server for another game, we let you switch games under a single plan, as long as you have enough RAM. Check out all of the games we host below!

Updated 8 months ago