

Install a Mod to the Client
If you are looking to create your own modpack or add some mods to an existing modpack, this guide will show how to install a mod to the client. There are a number of ways this can be done, depending on the Minecraft launcher being used.
Notes About Installing Mods to an Existing Mod PackInstalling mods into a modpack can be unstable, so always back up your modpack or server files first. You can backup your mod pack by copying and pasting the whole directory/folder. Mods may not work right away due to version conflicts, so expect some trial and error.
Install a mod using Curseforge Launcher
The Curseforge Launcher is one of the easiest ways to install a mod. As the launcher is directly connected to the Curseforge website, you will have direct access to every mod that is hosted on the website, allowing for simple mod installation. There are a few ways to install mods using the Curseforge Launcher.
Add a mod to a new profile
If there is a mod you are interested in playing with, this option will help with installing the correct versions required to play the mod.
-
Start the Curseforge Launcher.
-
If you are currently not on the Minecraft page, click Minecraft on the left navigation bar.
-
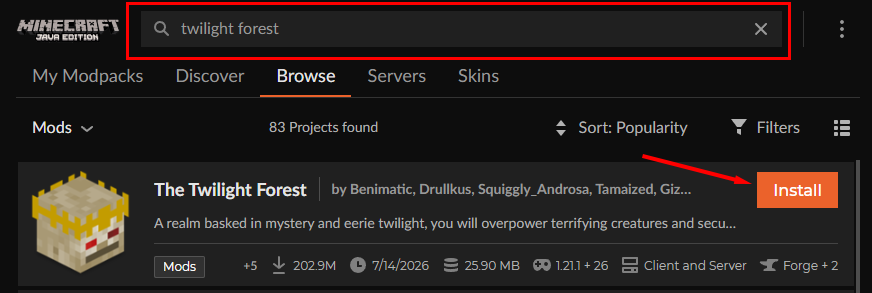
In the Search bar at the top of the launcher, type in the name of the mod you would like to install.
-
Click the Install button to install the latest version, or browse for a version:
- Click on the mod name to view the project.
- Under the project details, click Versions.
- Search for the file you would like to install and press the Install button.
-
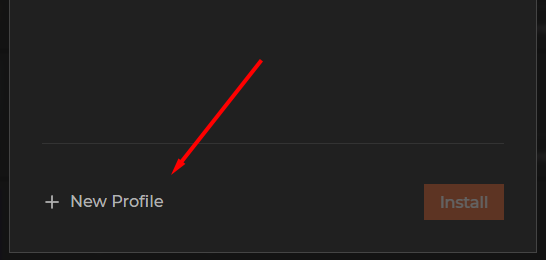
On the installation box, click New Profile.
-
Fill in the details for the new profile, then click Create.
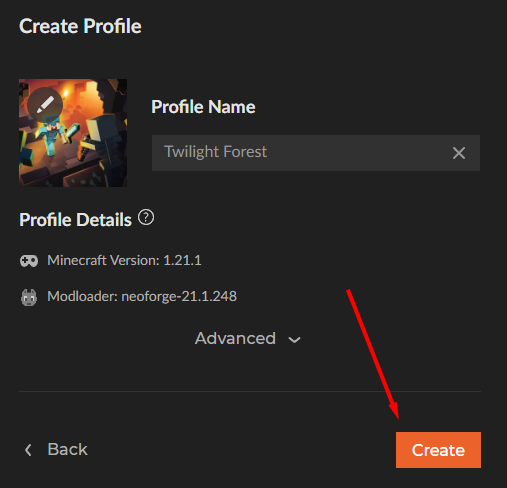
You should now have a brand new Curseforge profile with the mod installed.
Add a mod to an existing modpack or profile
This method allows you to pick a mod and install it to an existing profile. It could be a custom profile or an existing modpack. Note that this method may not work if the mod is not compatible with the existing profile.
-
Start the Curseforge Launcher.
-
If you are currently not on the Minecraft page, click Minecraft on the left navigation bar.
-
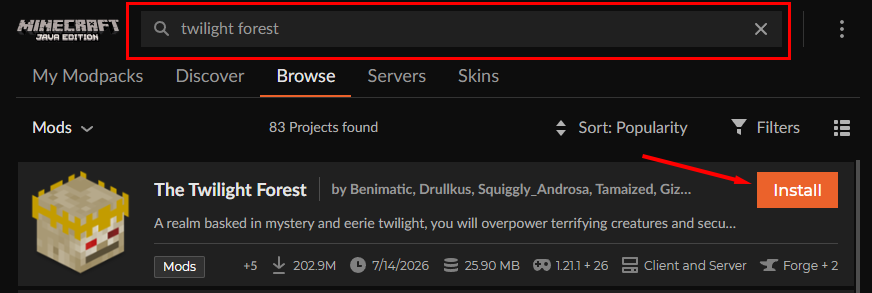
In the Search bar at the top of the launcher, type in the name of the mod you would like to install.
-
Click the Install button to install the latest version, or browse for a version:
- Click on the mod name to view the project.
- Under the project details, click Versions.
- Search for the file you would like to install and press the Install button.
-
On the installation box, select the modpack you would like to install the mod to, and click Install.
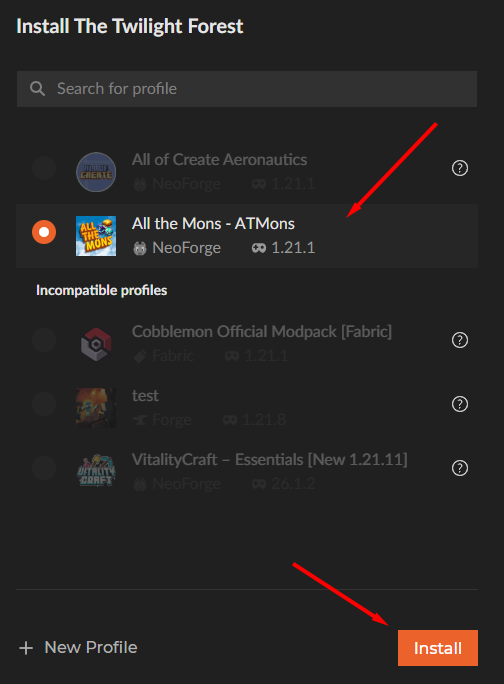
- If the project is greyed out and can't be selected, check if the project has Content Management enabled. Content Management can be enabled by right clicking the profile, click Profile Options, and checking Allow content management for this profile.
- If a project is listed under Incompatible profiles, it means the game version or mod loader is not compatible with the mod. Try another modpack, selecting a different mod version, or pick another profile.
Your modpack should now have the new mod installed.
Manually add a mod
For mods not on the Curseforge platform, or for manual downloads, this method can be used to directly add a mod to the launcher. Note that mods not compatible with the game version will not be able to load. This method requires an existing profile.
-
In a web browser, download the mod file from a website such as Curseforge. This file will be a
.jarfile and will be found in the Downloads folder on the computer. Keep this folder open for later.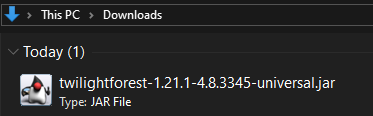
-
Start the Curseforge Launcher.
-
If you are currently not on the Minecraft page, click Minecraft on the left navigation bar.
-
Click on the My Modpacks tab if you are not already here.
-
Right-click the profile you would like to add the mod to and click Open Folder.
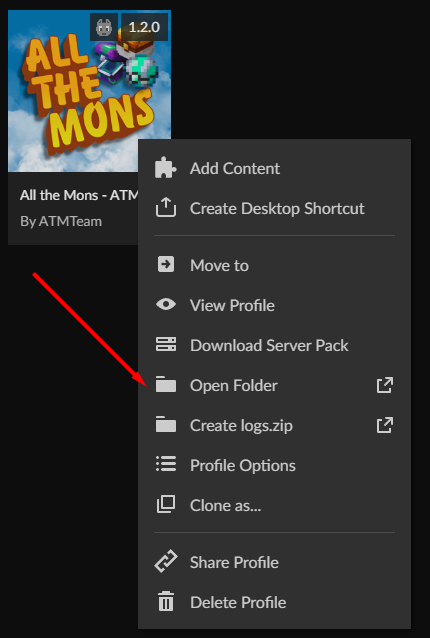
-
On the file explorer, click on the
modsfolder to open the folder.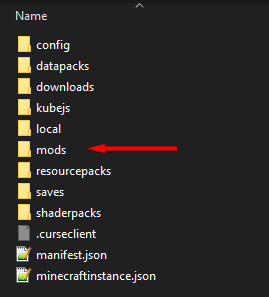
-
Copy the downloaded mod file into the
modsfolder by dragging over the mod.jarfrom the download folder. -
Check for any additional installation instructions required for the mod, such as additional setup or dependencies.
-
In the Curseforge Launcher, click on the profile to view details, then click on the Content tab. If the new mod does not show up yet, click the Refresh icon in the top-right corner of the list.
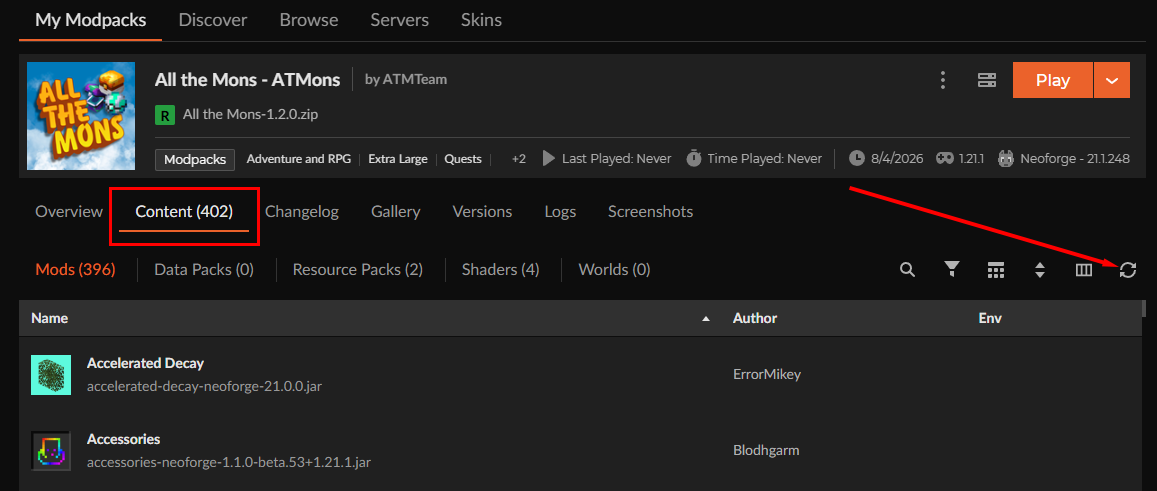
You should now see the mod installed. If the mod does not show up, the mod may not be compatible with the game version or mod loader.
Install a mod using FTB App
The FTB App is another way to play with mods. It also has access to Curseforge for a wide range of mods and modpacks, but you can also create new instance for custom mods.
Install mods to a custom instance
If you would like to set up a custom modpack, these instructions will show how to set up an instance and install mods to it.
-
Start the FTB App.
-
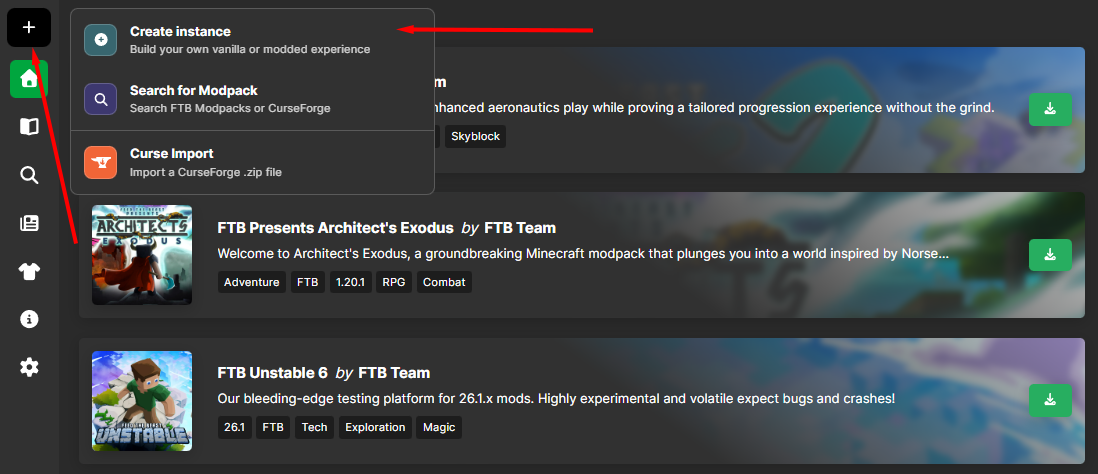
Click the plus (+) icon at the top of the left navigation bar and select Create instance.
-
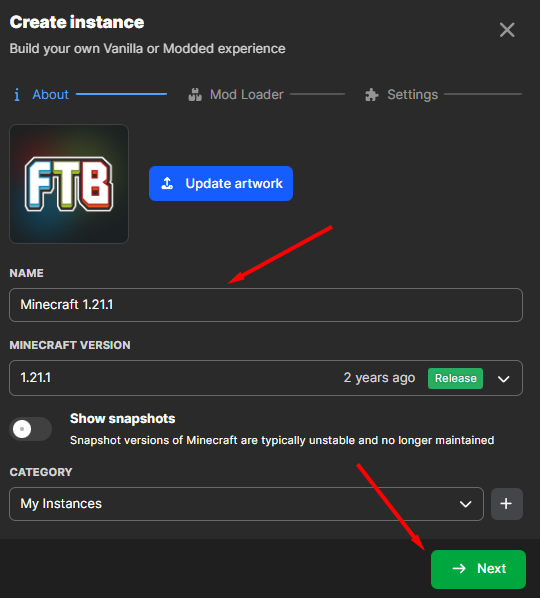
Fill in the instance details and select the Minecraft version the desired mod is compatible with, then click Next.
-
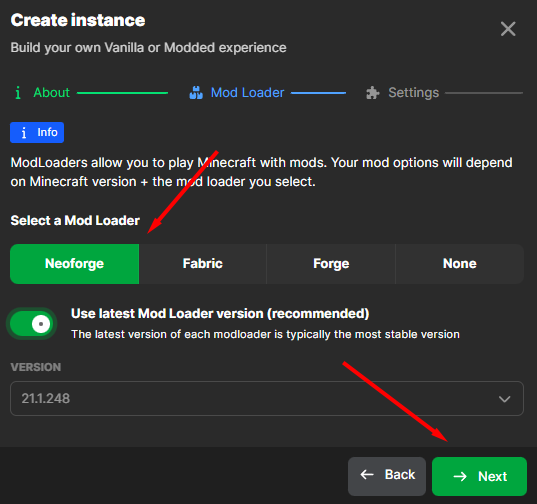
On the next page, select the Mod Loader the mod is compatible with. Optionally, select a Mod Loader version, then click Next.
-
On the final page, fill in the settings for the instance, and click Create.
-
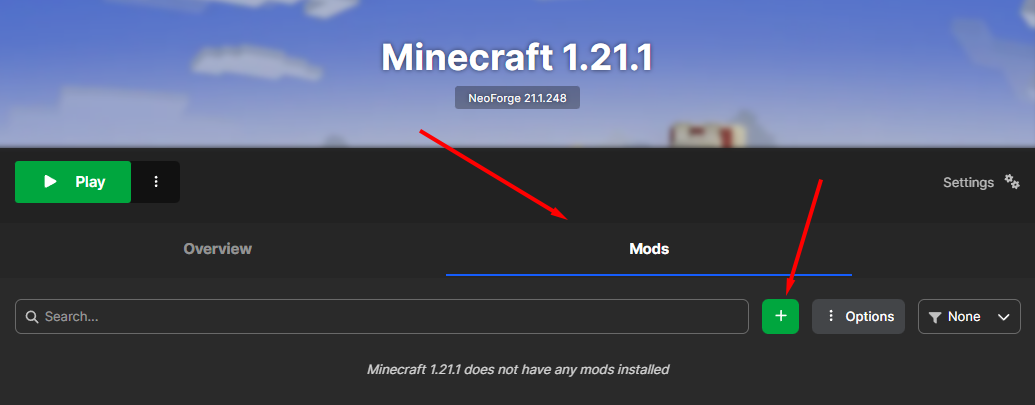
Click on the new instance that was created to view instance settings, then click on the Mods tab.
-
Press the green plus (+) icon, then search for the mod's name. If the mod does not show up, check for spelling errors or if the mod is compatible for the game version and mod loader.
-
Click Install on the mod, then optionally select a mod version, and click Install.
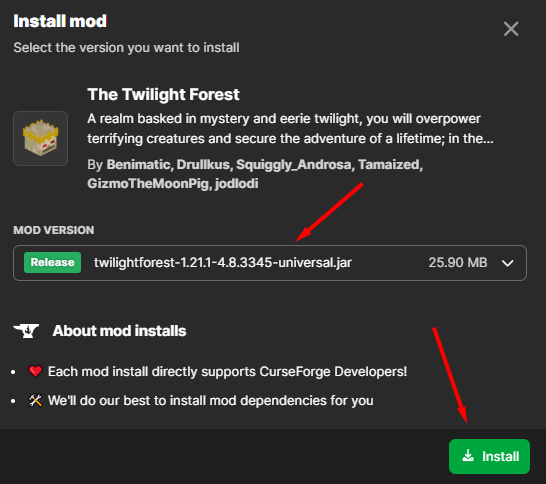
You should now have a brand new FTB instance with the mod installed.
Install mods to an existing modpack
This method allows you to install additional mods to an existing profile. Note that modpacks will have the mod list locked down, so adding more mods must be enabled.
-
Start the FTB App.
-
If the modpack is not installed yet, download the desired modpack.
-
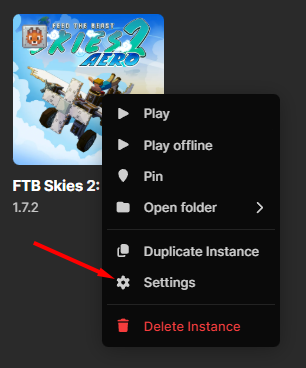
Right click the modpack you would like to add mods to and click Settings.
-
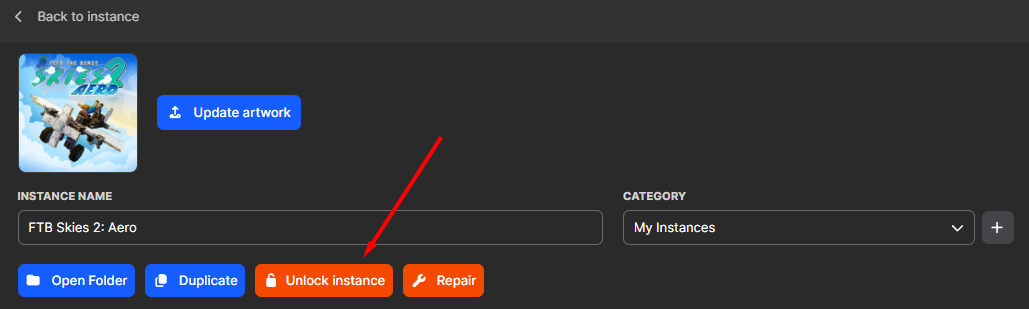
Below the Instance name, click Unlock instance. Click Confirm after reading the warning message.
-
Click Back to Instance in the top-left of the launcher window to go back to the instance overview.
-
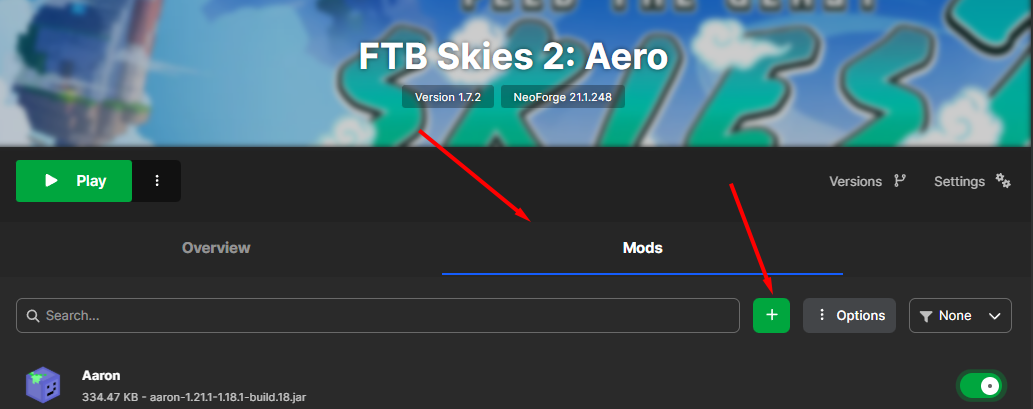
Click on the Mods tab, then press the green plus (+) icon and search for the mod's name. If the mod does not show up, check for spelling errors or if the mod is compatible for the game version and mod loader.
-
Click Install on the mod, then optionally select a mod version, and click Install.
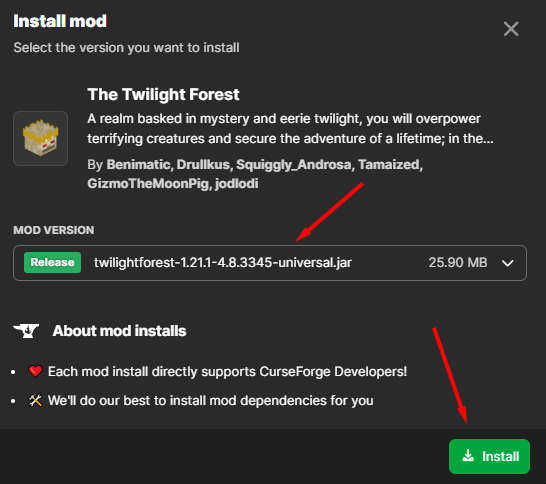
The mod should now be added to the modpack!
Manually add a mod
For mods not available through the FTB App, or for manual downloads, this method can be used to directly add a mod to the launcher. Note that mods not compatible with the game version will not be able to load. This method requires an existing profile.
-
In a web browser, download the mod file from a website such as Curseforge. This file will be a
.jarfile and will be found in the Downloads folder on the computer. Keep this folder open for later.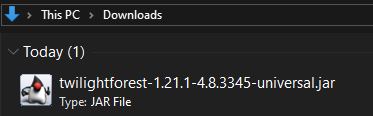
-
Start the FTB App.
-
Right click on the instance you would like to add mods to. Hover over Open folder and select Mods. This will open directly to the
modsfolder.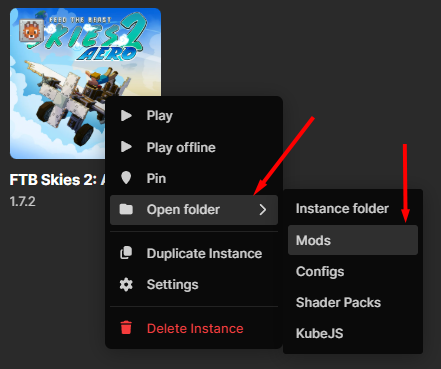
- If you are unable to see the Mods option in the Open folder menu, click on Instance folder or Open folder to open the instance, then look for the
modsfolder. - If there is no
modsfolder present, the folder may not be included yet. Amodsfolder can be created, or use the launcher to install a mod first.
- If you are unable to see the Mods option in the Open folder menu, click on Instance folder or Open folder to open the instance, then look for the
-
Copy the downloaded mod file into the
modsfolder by dragging over the mod.jarfrom the download folder. -
Check for any additional installation instructions required for the mod, such as additional setup or dependencies.
-
In the FTB App, click on the instance you added the mod into, then click on the Mods tab. If the new mod does not show up yet, click the Options button next to the Search bar, then click Refresh Mods list.
You should now see the mod installed! If the mod does not show up, the mod may not be compatible with the game version or mod loader.
Install a mod using Technic Launcher
The Technic Launcher is the primary way to install modpacks from the Technic platform. Unlike other launchers, the Technic Launcher does not support creating a blank instance, so mods can only be added to existing modpacks. In addition, as the Technic Launcher is not connected to Curseforge, mods will need to be installed manually.
-
In a web browser, download the mod file from a website such as Curseforge. This file will be a
.jarfile and will be found in the Downloads folder on the computer. Keep this folder open for later.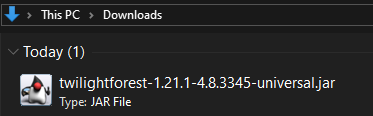
-
Start the Technic Launcher
-
If you have not downloaded a modpack yet, install the desired modpack.
-
On the Modpacks page, click on the modpack you would like to edit to view the modpack page.
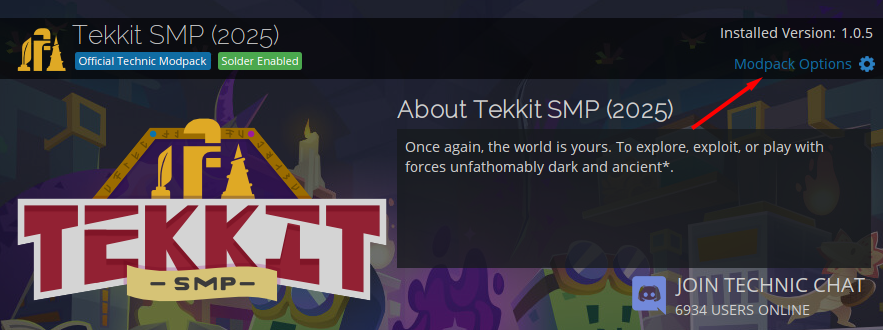
-
Click Modpack Options under the Installed Version, then click the Open button next to the Install Folder.
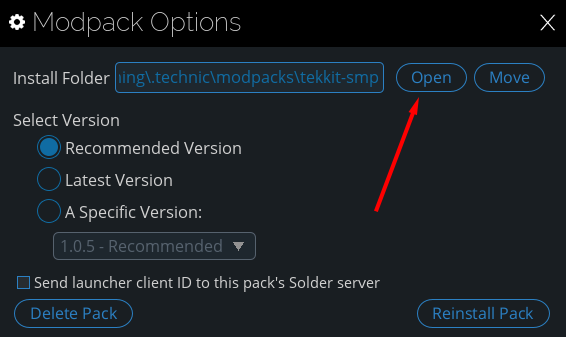
-
On the file explorer, click on the
modsfolder to open the folder.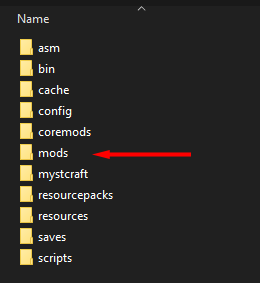
-
Copy the downloaded mod file into the
modsfolder by dragging over the mod.jarfrom the download folder. -
Check for any additional installation instructions required for the mod, such as additional setup or dependencies.
Press the Play button on the Technic Launcher, and if the mod version is correct for the modpack, you should now see the extra mod installed!
Install a mod using Prism Launcher
Prism Launcher is a lightweight launcher that can also be used to manage multiple instances of Minecraft. As it is a third-party launcher, not every modpack will be available to install, but adding new mods is simple.
Using the MultiMC launcher.As Prism Launcher is based on MultiMC, there are similar menus and features shared between it and Prism Launcher. However, not all features may work or are present. If using MultiMC, instructions on manually adding a mod must be used.
Install a mod to a new instance
If you would like to set up a custom modpack, these instructions will show how to set up an instance and install mods to it.
- Start Prism Launcher
- Click Add Instance in the top-left corner of the launcher.
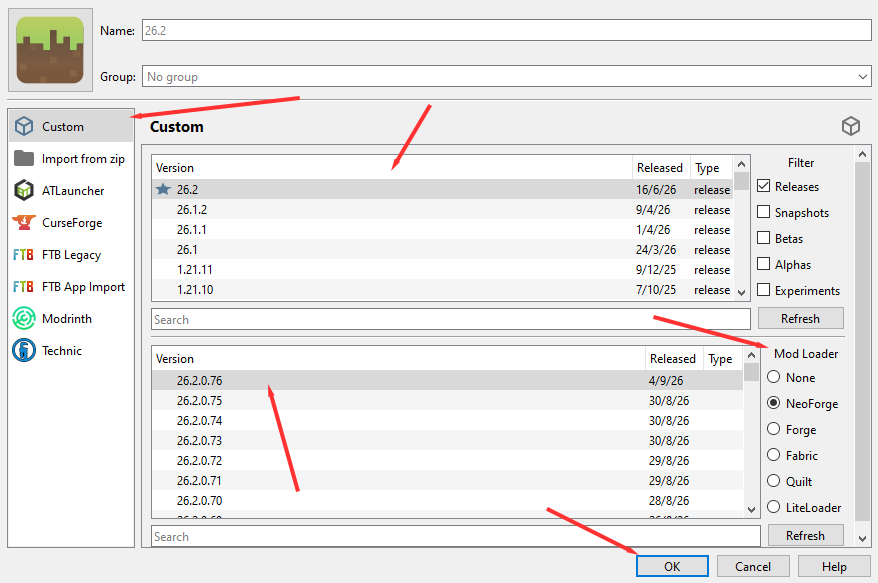
- Click on Custom to create a custom instance.
-
Under Version, select the game version you would like to use
-
Below the Version window, select NeoForge, Forge, or Fabric, depending on what is needed.
-
Select a Version for the mod loader, then click OK to create a profile.
-
- Click on the new profile, then click Edit on the right navigation bar.
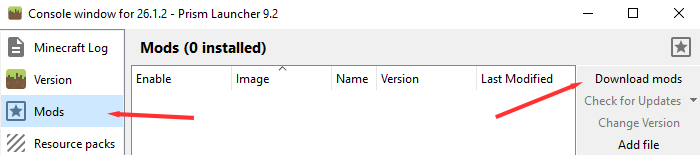
- Click on Mods on the left navigation bar.
- Download the mod through the launcher. Not all Curseforge mods are available through this method.
-
On the right navigation bar, click Download mods.
-
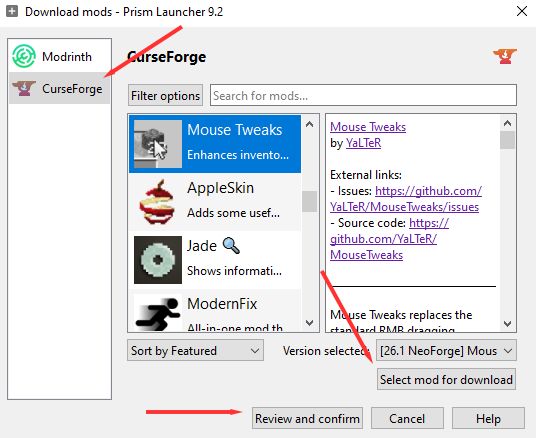
Select Modrinth or Curseforge and search for the desired mod.
-
Click on the mod you want, then optionally pick a version and press Select mod for download.
-
Once you have every mod selected, click Review and Confirm, then press OK.
-
- Install a mod to a profile manually.
-
In a web browser, download the mod file from a website such as Curseforge. This file will be a
.jarfile and will be found in the Downloads folder on the computer.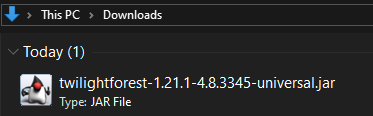
-
Open the folder where the mod file is downloaded to, then drag the mod file into the Mods box in the middle of the screen. This will automatically copy the mod into the instance.
-
Check for any additional installation instructions required for the mod, such as additional setup or dependencies.
-
- Download the mod through the launcher. Not all Curseforge mods are available through this method.
You should now see the mod installed to a custom instance.
Install a mod to an existing modpack
MultiMC and Prism Launcher can also be used to download modpacks. As such, mods can also be added into an existing modpack instance.
- Start MultiMC or Prism Launcher
- If you don't have a modpack yet, download or import a modpack by clicking New Instance, then select the applicable option.
- Click on the new profile, then click Edit on the right navigation bar.
- Download the mod through the launcher. Not all Curseforge mods are available through this method.
-
On the right navigation bar, click Download mods.
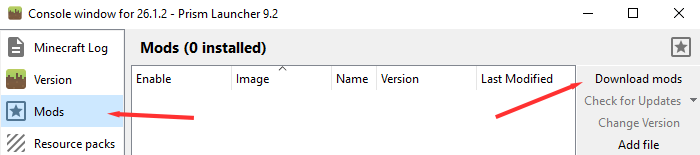
-
Select Modrinth or Curseforge and search for the desired mod.
-
Click on the mod you want, then optionally pick a version and press Select mod for download.
-
Once you have every mod selected, click Review and Confirm, then press OK.
-
- Install a mod to a profile manually.
-
In a web browser, download the mod file from a website such as Curseforge. This file will be a
.jarfile and will be found in the Downloads folder on the computer.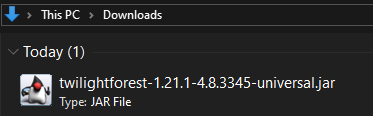
-
Open the folder where the mod file is downloaded to, then drag the mod file into the Mods box in the middle of the screen. This will automatically copy the mod into the instance.
-
Check for any additional installation instructions required for the mod, such as additional setup or dependencies.
-
- Download the mod through the launcher. Not all Curseforge mods are available through this method.
You should now see the additional mod installed to the modpack.
Install a mod using Minecraft Launcher (manual method)
The Minecraft Launcher is the default launcher for Minecraft. Mods can be installed to this launcher, but game profiles are not often separated. As such, switching between profiles may cause issues if different mod lists are accidentally loaded.
This process may take longer to install mods to as all steps will require manual installation.
-
Download and install the desired mod loader. There are download links for Minecraft Forge, Fabric, and NeoForge. Once downloaded, double-click on the downloads to run the installer. Follow the instructions provided for installing a Client installation.
-
In a web browser, download the mod file from a website such as Curseforge. This file will be a
.jarfile and will be found in the Downloads folder on the computer. Keep this folder open for later.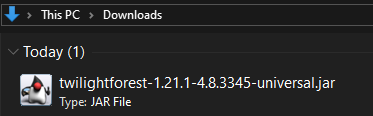
-
Start the Minecraft Launcher.
-
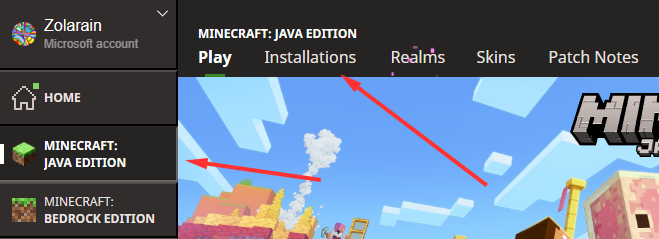
Click on Minecraft: Java Edition on the left navigation bar.
-
Click on Installations on the top navigation bar, then search for the installation created by the installer.
-
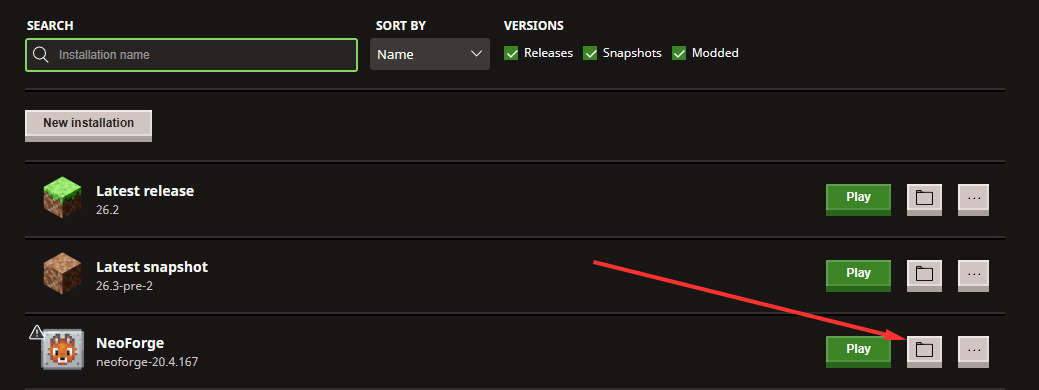
Click the folder icon on the right of the installation to open the installation folder in a file browser.
-
Click on the
modsfolder to open it. If nomodsfolder exists, make sure that the mod loader has been installed, then create a new folder calledmods. -
Copy the downloaded mod file into the
modsfolder by dragging over the mod.jarfrom the download folder. -
Check for any additional installation instructions required for the mod, such as additional setup or dependencies.
You should now have mods installed to the installation. Note that the Minecraft Launcher does not have any checks or validations for mod compatibility. Mods that are not compatible with the chosen game version or mod loader may not load or will crash the game.
Updated about 1 month ago