Install Mods on a 7 Days to Die Server or Client
Uploading Mods to Your Server
- Download the latest version of the mod/overhaul server files from the mod developer's Discord or Github. Make sure it works with the latest version of 7 Days to Die.
- If you are not installing an overhaul mod, create a
Modsfolder on your PC and put all of your modlets in it. - Update your server to the latest version of 7 Days to Die.
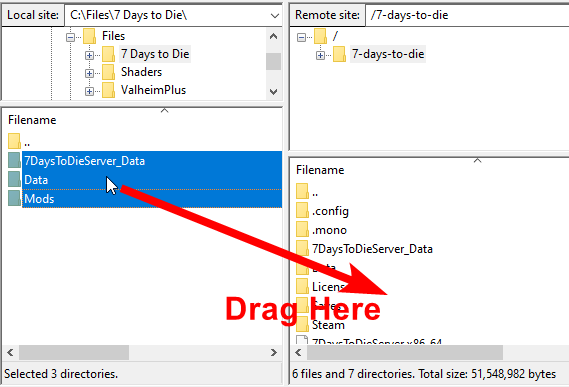
- Connect to your server through SFTP.
- Upload the overhaul files (usually a
7DaysToDieServer_Dataand aDatafolder) and/or theModsfolder to the7-days-to-diefolder on your server. Make to sure overwrite any files on the server, especially for overhaul mods.

SFTP Uploading
- Start your server.
Server Crashing or Mods not Loading on StartYou can check the output logs in Command Center by clicking on the Files tab and then the
7DaysToDieServer_Datafolder and look for theoutput_log_[DATE-TIME].txtfiles and click on them. Read through that file to determine the cause of the crash or if the mods are being loaded or not.

Sample output log
- Install the mods on your client as described below.
Order is ImportantMake sure to do the server update (Step 3) first before uploading your mod files (Step 5) so that the mod files won't be overwritten by the server update.
Updating Your ModsYou can follow these same directions above to update your modded server.
Installing Mods on Your Client
Version A20.4 and for XboxGame Pass
- Download the latest version of the mod client files.
- Hit Windows Key+R on your keyboard.
- In the field that pops up, type
%appdata% - Make sure you're in the
Roamingfolder and click then on7DaysToDie. Doing so should put you in a folder that looks similar to this:

- Create a
Modsfolder if it does not exist. This is case-sensitive. - Copy the mod folder(s) to your new
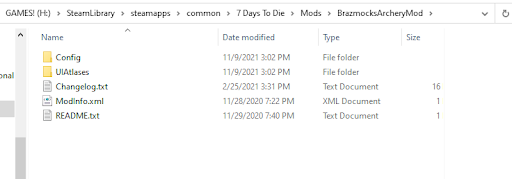
Modsfolder. Leave the names for the folders as-is and make sure they contain theModInfo.xmlfile as shown in the examples below.


- Start your game and test to make sure the mods are loading by hitting the
F1key and checking the console for mod loading messages such as these:

Before Version A20.4
Installing Specific Mods (or Modlets)
- Download the latest version of the mod client files.
- Navigate to your 7 Days to Die folder on your PC. (Usually
C:\Program Files (x86)\Steam\steamapps\common\7 Days To Die) - Create a
Modsfolder if it does not exist. This is case-sensitive. - Copy the mod folder(s) to your new
Modsfolder. Leave the names for the folders as-is and make sure they contain theModInfo.xmlfile as shown in the examples below.

Mods folder

Inside of a mod folder
- Start your game and test to make sure the mods are loading by hitting the
F1key and checking the console for mod loading messages such as these:

Sample console
- Connect to your modded server. As long as the mods match on both the server and client, you should be able to connect fine.
Installing Overhaul Mods
The Easy WayThe easiest way to install overhaul mods to your client is to use the 7 Days to Die mod launcher found here.
If you'd rather be a masochist and do it the hard way (or the overhaul is not available on the mod launcher):
Legacy install for steam.A20.4 has changed the way that mods are handled. This would be for all overhaul mods for a20.3 and below
- Download the latest version of the overhaul client files.
- Navigate to your 7 Days to Die folder on your PC. (Usually
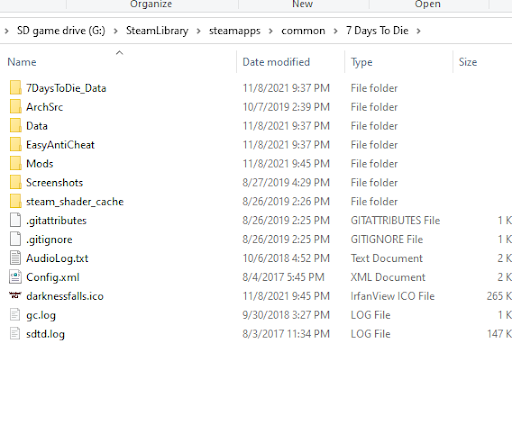
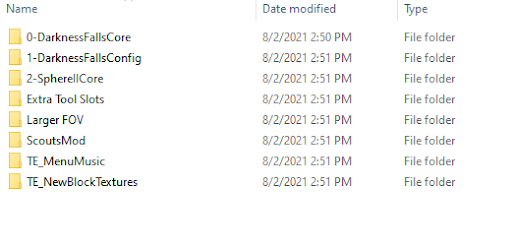
C:\Program Files (x86)\Steam\steamapps\common\7 Days To Die) - Copy the overhaul files to that folder making sure to overwrite any files it asks to overwrite. Your folders should look similar to the following (the examples below are using the Darkness Falls overhaul):

7 Days to Die folder

Mods folder
- Start your game and connect to your modded server. As long as the mods match on both the server and client, you should be able to connect fine.
Updated 3 months ago

